foodsofjane
  • Home
  • Recipes
  • CLE
  • Contact
  • Home
  • Recipes
  • CLE
  • Contact
Search

Bolognese Sauce

1/28/2020

2 Comments

 
I actually call this one Marcie's bolognese because the mom of a family that I used to babysit for would ALWAYS make this and it was always soooo different and good. I love the flavor that the nutmeg brings to the dish. It's also VERY good with a pat of butter mixed in at the end!! Pro tip!!

It makes a pretty decent portion, enough for a whole pound of pasta which is double my normal recipes. I would say enough for 6 large entrees or 4 small entrees...but you can freeze the leftovers and reheat in a pot anytime!
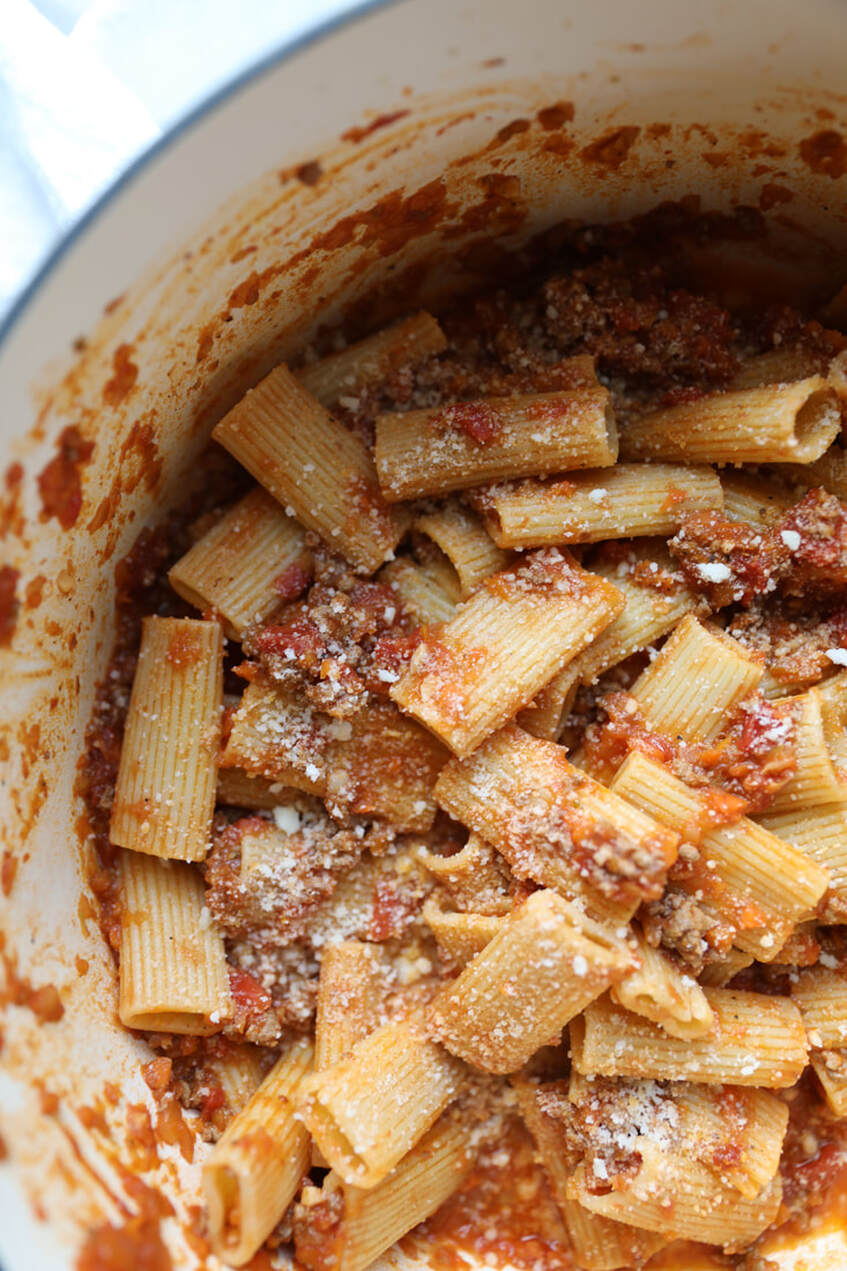
Picture
What you need:
  • 1 lb pasta (I used rigatoni)
  • 2 tbsp EVOO
  • 1 cup finely diced yellow onion
  • 1 cup finely diced celery
  • 1 cup finely diced carrots
  • 3 minced garlic cloves 
  • 1 bay leaf
  • 1 lb ground meat (the less lean the better tasting IMO. I use a mix of pork, beef and veal!)
  • 1/2 tsp nutmeg (powder form is fine)
  • 1/3 cup red wine (I used a full bodied cab)
  • 8 oz tomato sauce of choice
  • 12 oz whole tomatoes (I use the juice they come in too - whole jar)
What to do:
  1. Add the EVOO, onion, celery, and carrots, garlic and bay leaf into a large and deep skillet or sauce pot and season with salt and pepper. Cook until fragrant - about 10 minutes on med-high heat. 
  2. Scoop the veggies to the sides of the dish and add the ground meat into the center of the pan. Season with salt, pepper and nutmeg. Break it apart into desired sized pieces while you cook and brown the meat.
  3. Once the meat is fully browned, add in the wine and let the alcohol evaporate and reduce until there isn't a ton of liquid accompanying the veggies and meat.
  4. Next, add the tomato sauce and whole tomatoes to the veggies and meat. Break apart the whole tomatoes into desired size chunks. Sometimes I like it chunky sometimes I like them fine!
  5. Let the sauce simmer for a half hour or so (with a lid off if you want the sauce to be more thick and meat heavy) and with a lid on if you want it to be a little more thin and saucy.
  6. Do not forget to mix a scoop of pasta water into the sauce and definitely don't forget to top it with parm or pecorino romano cheese!
2 Comments

Cauliflower Gnocchi

1/23/2020

1 Comment

 
Just like the rest of the world, I'm in love with Trader Joe's cauliflower gnocchi. I love carbs, but if it's possible to eat a little healthier without noticing that carbs are missing, I'm game. I know there's a handful of you that don't have access to a Trader Joes or if you do, you live in an area where it's constantly sold out so I wanted to try and make a copycat recipe from scratch at home!

So the ingredients on the back of the TJ's package say cauliflower, cassava flour, potato starch, olive oil and salt. I actually had everything I needed at home to get started on recipe testing! Pamela's Products sent me a box full of goods so I had their cassava flour which is 100% yucca root so gluten free, paleo, non-GMO and vegan. I also have a lot of tapioca starch at home because I use it to make steamed rice noodle rolls so I subbed that for the potato starch that's in the TJ's recipe - Bob's Red Mill has tapioca starch so it isn't too hard to find in stores, unlike the Asian brand I have and use at home.

I decided to boil the cauliflower vs use it raw. I just felt like the moisture from boiling it (even though I removed most of it) was needed in order to create a softer texture gnocchi.

DON'T SKIP READING THIS PART!!
Every cauliflower head is a different size. The one I used was fairly large so keep that in mind. (I would say that once riced, the head I used produced somewhere between 2-3 cups of cauliflower and it make like 3 batches of 20 gnocchi pieces.) The best way to figure out if you have the right ratio of flour/starch to cauliflower would be to make one little gnocchi and sear it on both sides in a skillet with oil and then taste-test it and adjust the ratio from there. I found that adding in more flour or starch makes the gnocchi more firm so if your results are soggy - add more of the flour/starch in small equal amounts and taste test again.

A few cauli gnocchi life hacks:
If you don't have a food processor or want to save time, you could probably purchase pre riced cauliflower and use that - just make sure if it's frozen, you try and get most of the liquid out of the cauliflower so that it's easier to combine with the flour and mold into pieces.

Also, for more flavor, you could add parmesan cheese or (vegan) nutritional yeast. I would say a a couple of tablespoons. Also not against the idea of seasoning the cauliflower with garlic powder or herbs like oregano, parsley and basil.

You can either fry or bake them. I fried them in a skillet with olive oil and fresh sage but the trick to frying and keeping the shape in tact would be popping them in the freezer for 15 minutes before adding them to the skillet! No need to freeze with baking since they sit still on the baking sheet the whole time. I also bet you could air fry them but I don't own an air fryer so I would check other bloggers recommendations for temperatures and settings.
Picture
What you need:
  • 1 medium sized head of cauliflower (makes 3 batches of about 20 gnocchi)
  • 1/3 cup cassava flour
  • 1/4 cup tapioca starch
  • 1/2 tsp garlic powder (optional for flavor)
  • 1/2 tsp celtic salt (regular is fine too, cetlic is just healthier and more natural.)
  • 1/2 tbsp olive or grape seed oil
  • 1 additional tbsp of olive or grape seed oil if cooking them via skillet
  • Parchment paper or non-stick spray if cooking via oven
What to do:
  1. Cut the head of cauliflower into florets and boil for 6-8 minutes or until you can cut through it easily with a butter knife.
  2. Use a food processor to blend the florets until you have a cauliflower rice texture.
  3. Remove the rice from the processor and set on a dish that's lined with a few paper towels and then press down with more paper towels repeatedly in order to remove as much liquid as possible.
  4. Combine the cauliflower, cassava flour, starch, garlic powder and salt in a large bowl.
  5. Use your hands to grab teaspoon sized scoops and squish them into a ball with the palm of your hand. Press on them to get them to shape like a gnocchi and then lay it flat.
  6. If frying in a skillet with olive oil, stick the tray in the freezer for 15 minutes before searing for a few minutes on each side in oil. If baking, put some parchment paper on a baking sheet and bake for 10-12ish minutes on each side at 400 F. 
  7. Store any leftovers in the freezer and use whenever! I froze them on the cookie sheets first overnight and then added them all into the same ziplock bag once they were firm to keep them from sticking together.
1 Comment

Grandma's Pierogies

1/22/2020

5 Comments

 
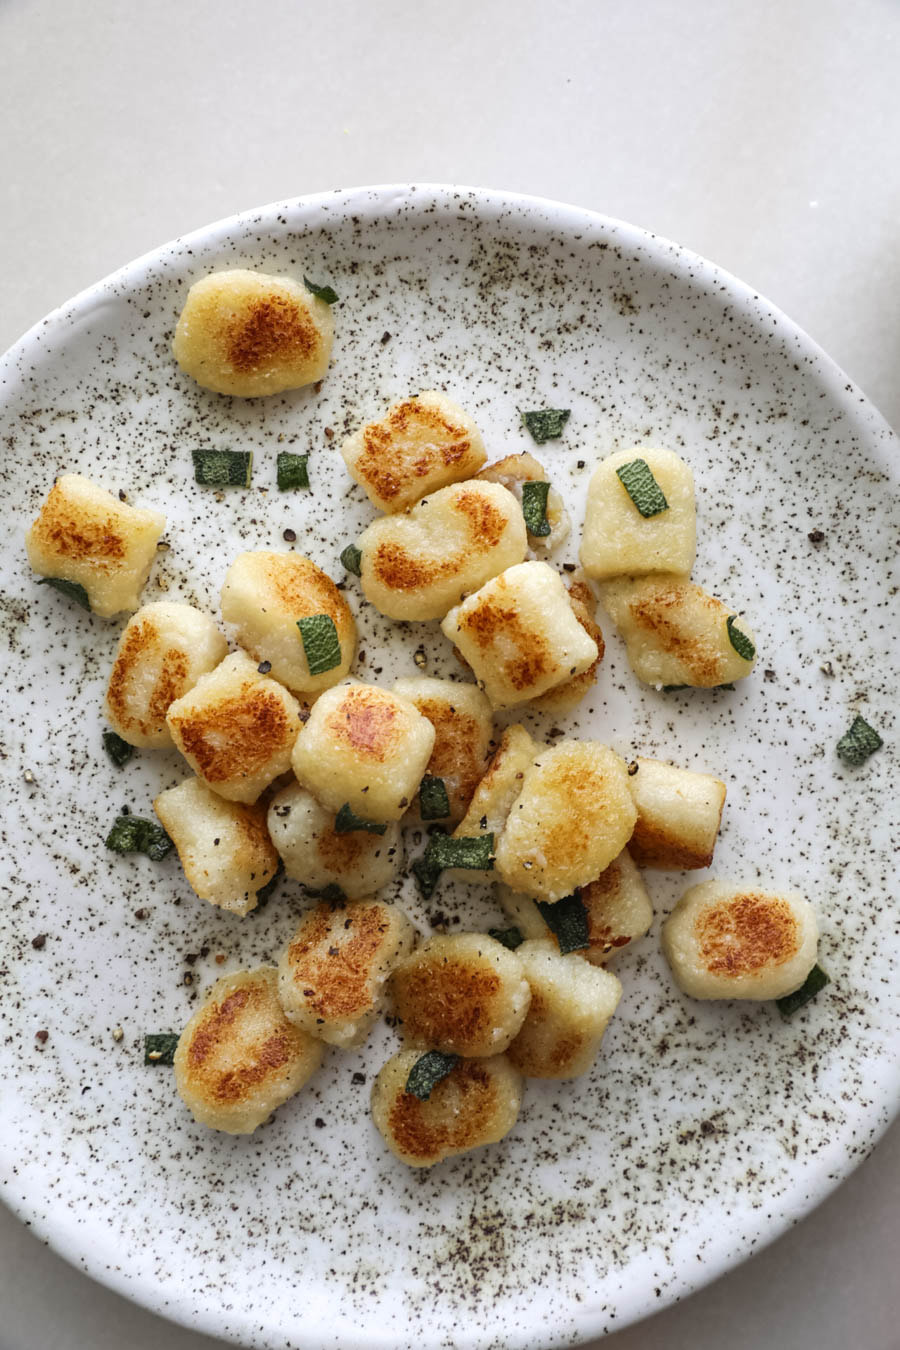
I grew up eating these delicious little dough pockets every single year on Christmas Eve! They're a family staple from my dad's side. My Grandma learned how to make them from her mom (who I was lucky enough to have around for a lot longer than most people can say about their great grandparents!) This recipe has been passed down for generations from Polish roots so it's v authentic and v special to lots of people in my family. 

My Grandma's recipe makes about 30-50 pierogies depending on how big you make them and how much of the dough you repurpose as you go along. (The key to making the most out of the dough scraps is covering them so that nothing dries out!) I really love how there's milk, butter and sour cream in the dough recipe  - it makes it so much more stretchy and playable compared to a basic flour/water/egg dough mixture.
Picture
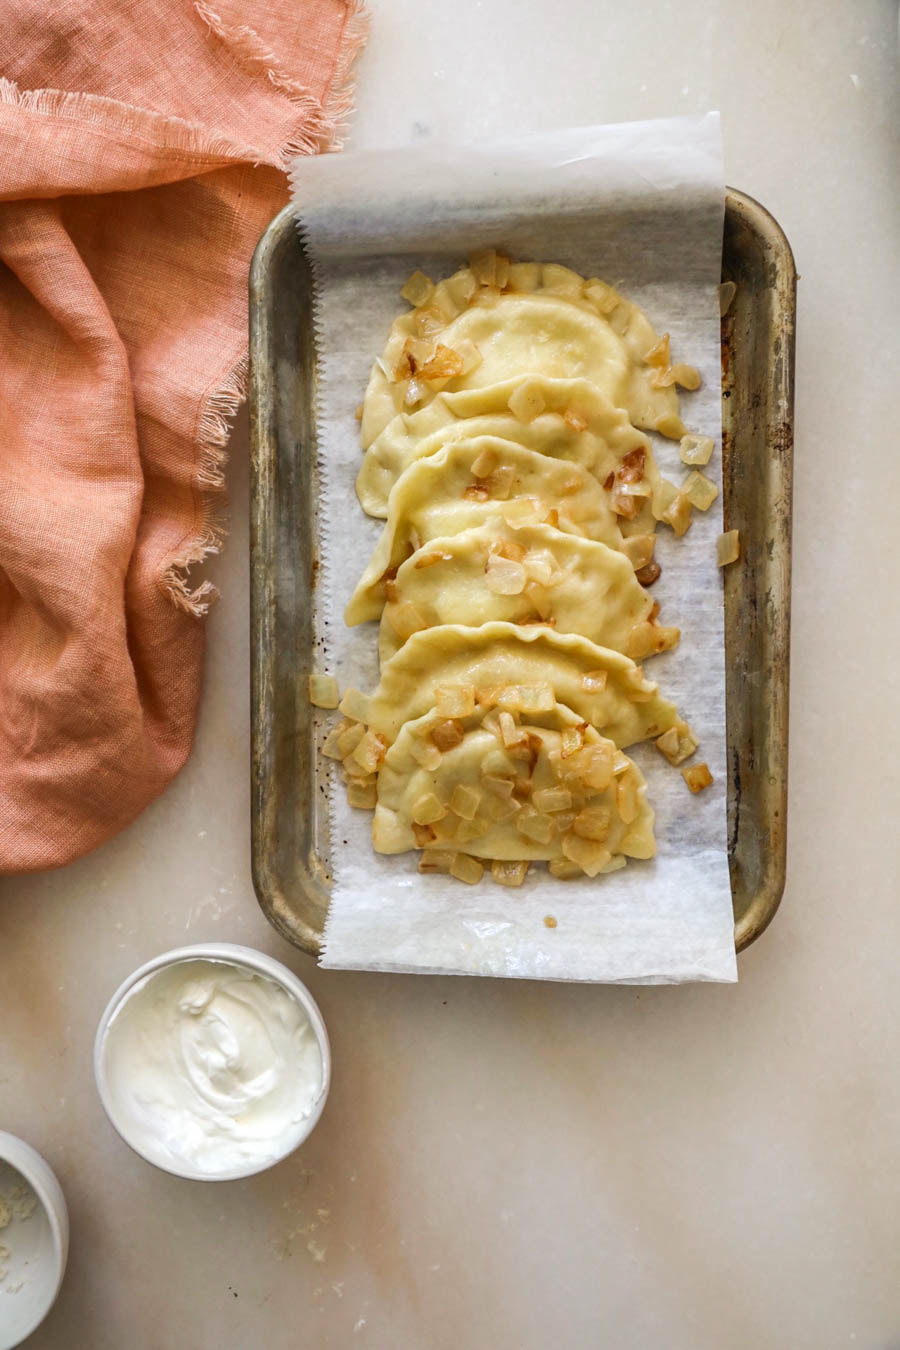
What you need:
(Dough)
  • 5 cups flour
  • 1/4 cup melted butter (1/2 stick)
  • 1/2 cup milk
  • 3 eggs
  • 1 tsp salt
  • 1/2 pint sour cream
(Potato filling)
  • 5 lbs yukon gold or russet  potatoes
  • 8 oz cream cheese
  • 1 tsp salt
What to do:
  • Peel the potatoes and cut them in half. Bring a large pot of salted water to a boil and cook the potatoes until they are soft and can be sliced easily down the middle. (About 25 minutes - larger potatoes will take longer.)
  • Combine all of the dough ingredients by hand and knead until smooth for about 15 minutes. Let the dough rest covered for 10 minutes.
  • While the dough rests, mash the cream cheese and salt into the potatoes until smooth. Lumps are okay, just not huge lumps. (If your potatoes are too lumpy and you accidentally overcooked them, add a few tablespoons of milk and try mixing them in a blender or stand mixer.)
  • Split the dough in half or into fourths and cover whatever portions you don't plan on immediately working with in order to prevent the extra dough from drying out.
  • Roll the dough out until it's about 1/4 inch thick. Use a cup or a circle cookie cutter to cut out the individual pierogi wrappers. They should be around 2-3 inches in diameter.
  • Important! The side of the wrapper that's underneath and touching the surface you're working on is the side you want to put 1 tbsp of potato filling onto. Since it hasn't been exposed to the air like the top side has, it will stick together better when you go to seal it.
  • Since the dough is very playable, so feel free to stretch it around when you're getting ready to wrap and seal the flattened dough around the potato filling in order to not have anything bursting out the seems. You can pinch the edges to seal, or use a fork. Sometimes I like to use the end of a chopstick because I like the look and texture of it when things are more spread out.
  • Melt some butter and add diced onion to a large skillet and cook on medium heat until they start to caramelize. (This will be the bath for the pierogies once they are done cooking.)
  • Boil the pierogies in a large pot of salted water for about 8 minutes, they should float once they're done. 
  • Transfer the peirogies to the onion and butter mixture and cook for a few minutes. If you like crispy pierogies - cook and flip them longer than a few minutes until the sides start to crisp up and brown a little bit.
  • Serve with sour cream. My family loves to eat them with salt, pepper and hot sauce too!
5 Comments

Fried CHicken with Garlic sauce

1/13/2020

1 Comment

 
This totally looks like a normal fried chicken sandwich but what you can't tell from the photo is that it's not just any old fried chicken sandwich - it's a buttery, garlicky fried chicken sandwich. That's right. I roasted garlic and then mashed and combined that with melted butter in order to create the best non-buffalo tasting fried-chicken sauce I've ever had.
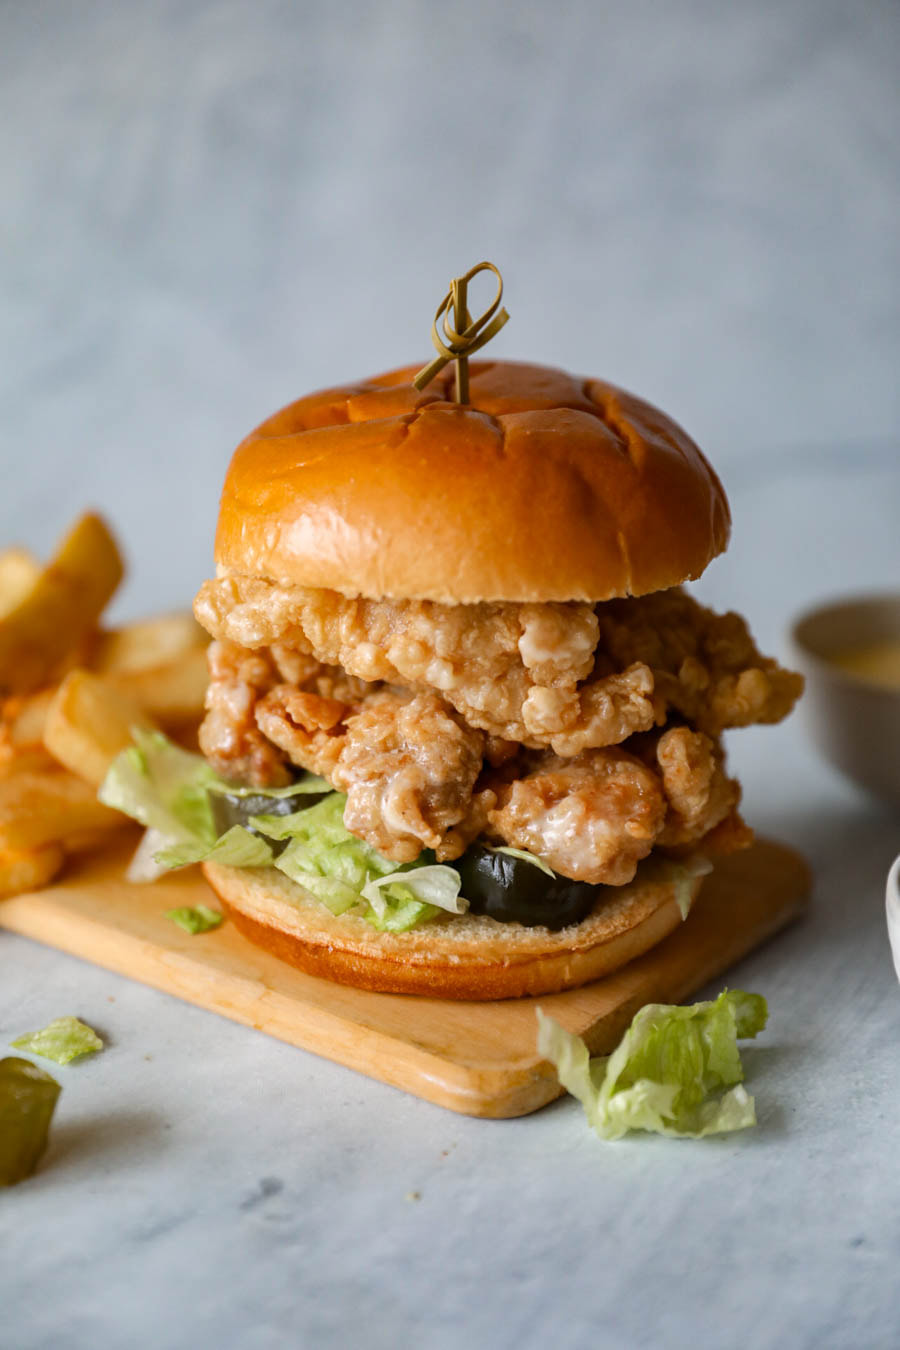
Picture
What you need:
  • 6 chicken thighs, boneless and skinless
  • 2 tbsp seasoned salt (Lawry's)
  • 1 head of garlic (use 6-8 cloves depending on how strong you like your garlic)
  • 1 tbsp olive oil
  • 1 stick of salted butter
  • 3 cups veg oil for frying the chicken
  • 2 cups flour
  • 1 tbsp garlic powder
  • 1 tsp salt
  • 6 brioche buns
  • lettuce
  • pickles
  • mayo
What to do:
  1. Brine the chicken thighs in 4 cups of cold water with the seasoned salt for at least two hours. (Overnight at the most and I find that a gallon ziplock bag works perfect.)
  2. Roast the garlic. Slice off the top part of a head of garlic, place it on a sheet of tinfoil and pour about 1 tbsp good quality olive oil over the top. Wrap the tinfoil around the garlic head and make sure it's completely covered. I roasted my garlic head for 25 minutes at 400 F.
  3. After the garlic has been roasted, the cloves should easily slide out and should be super soft so that you can mash with a fork. I prefer to blend them with the melted butter in a food processor - if you don't have them a whisk should work too!
  4. Heat 3 cups of vegetable oil in a large pot. Every stove is different but I crank mine 3/4 of the way to as high as it can go. (If you're normal and own a thermometer, the oil should be around 350 degrees F.)
  5. Combine the flour, garlic powder and salt in a large bowl and dredge each piece of chicken in it before dropping into the oil and frying until golden brown. (About 8-10 min)
  6. Spread a little of the garlic butter onto each brioche bun piece and toast in the oven for 6-8 minutes at 350 degrees F.
  7. Brush a generous amount of the garlic butter onto the fried chicken pieces before assembling the sandwiches. 
  8. I did bun, lettuce, pickles chicken, mayo and then top bun. Serve and eat while they're hot!
1 Comment

    Connect

    CONTACT FORM
    If you’d like to use my photos & recipes, please ask or link back to this site. Thank You.

    Calendar

    August 2022
    July 2022
    June 2022
    May 2022
    April 2022
    March 2022
    February 2022
    January 2022
    October 2021
    September 2021
    July 2021
    June 2021
    March 2021
    February 2021
    January 2021
    December 2020
    November 2020
    October 2020
    September 2020
    August 2020
    July 2020
    June 2020
    May 2020
    April 2020
    March 2020
    February 2020
    January 2020
    December 2019
    September 2019
    August 2019
    July 2019
    June 2019
    May 2019
    April 2019
    March 2019
    September 2018
    August 2018
    July 2018
    June 2018
    May 2018
    April 2018
    March 2018
    February 2018
    January 2018
    December 2017
    October 2017
    August 2017
    May 2017
    April 2017
    February 2017
    December 2016
    November 2016
    June 2016
    April 2016
    January 2016
    June 2015
    April 2015
    March 2015
    February 2015
    January 2015

    RSS Feed

FOODS OF JANE

mostly noodles
foodsofjane, llc  |  © Copyright 2021 |  Contact@FoodsOfJane.com

  • Home
  • Recipes
  • CLE
  • Contact