foodsofjane
  • Home
  • Recipes
  • CLE
  • Contact
  • Home
  • Recipes
  • CLE
  • Contact
Search

Chicken on the Grill

5/21/2020

4 Comments

 
This is hands down my favorite of all time way to grill chicken. You're probably thinking someone who makes pasta as often as I do doesn't know sh*t about how to cook meat on a grill. This is true, except for chicken. I can freaking make some damn good chicken on the grill.

I start off with a salt water brine (at least two hours or overnight) and then I use garlic powder and cayenne pepper and I brush layers of BBQ sauce onto the wings as they cook. If you don't have BBQ sauce they are just as good with the cayenne and garlic powder. You can use any part of the chicken for this recipe. I've done it with breasts, drums, thighs and wings. (Wings and drums are my fave!!)

As far as amount goes: make sure to have enough chicken for the number of people you plan to feed, which is obvious but there's always one person that will ask if I am not SUPER clear, lol. The salt water brine ratio is 1 cup water : 1 tsp salt, so however many cups of water it takes to cover the chicken in an airtight container or ziplock bag + the appropriate amount of salt.
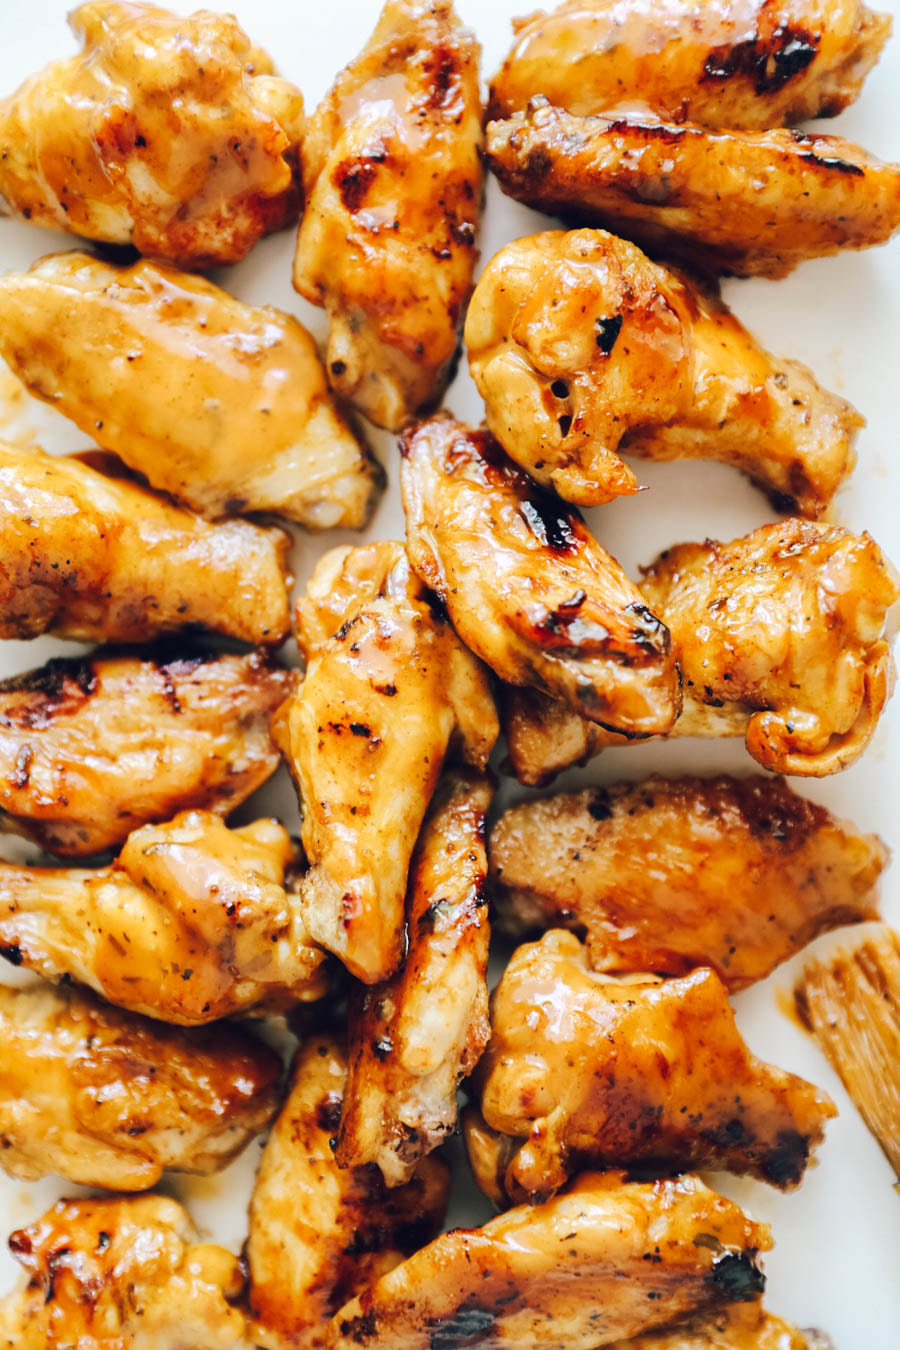
Picture
What you need:
  • Chicken - whatever parts you prefer (bigger parts will take longer to cook than smaller parts)
  • Salt (read above for brine ratio - it's 1 tsp salt per 1 cup water used)
  • Garlic powder
  • Cayenne pepper
  • Your fave BBQ sauce
What to do:
  1. Create your salt water brine. I place the chicken in a large ziplock bag and then use a measuring cup to add water one cup at a time until the chicken is mostly covered - then add 1 tsp of salt per each cup of water. (You can use Lawry's seasoned salt for even more flavor, I do that if I have it.)
  2. Let the chicken soak in the brine in the fridge for 2 hours or overnight. 
  3. Turn on the grill. I don't pay too much attention to the heat (as long as it's decently hot I start grilling) but the internet says for chicken it should be around 350 degrees F.
  4. Remove the chicken from the salt water brine and season with garlic powder and cayenne pepper (I use it like salt and pepper - a good amount but not a ton.)
  5. Throw the chicken on the grill and DON'T touch it. If you try to flip it and the meat clings to the grill, it isn't ready to flip yet. I usually close the grill and then let 10-15 minutes go by before tying to flip.
  6. Once you can easily flip the chicken to the other side, brush the cooked side with a layer of BBQ sauce and close the grill and let cook for 5-10 minutes. (5 mins for wings, 10 mins for larger pieces like a breast.)
  7. Flip again, brush with BBQ again. Depending on what bbq sauce you're using, there's a chance that cooking the chicken with it on for too long will cause the chicken skin to start to blacken (which is sometimes a good thing!) I would say to coat each side once or twice while flipping (and then you can always brush a little more sauce on it after you've taken off the grill.)
  8. Before removing from the grill, cut through a piece of the chicken to make sure it's cooked all the way through.
4 Comments

Raspberry Cheesecake Bars

5/19/2020

1 Comment

 
I always hesitate to put the word healthy in my recipe captions because I feel like there will be at least one health nut that will try to call me out saying "that's actually not healthy" but for me, this is a lot cleaner version of any dessert I would normally eat...and it's really freaking good!! Also, I've always been in love with the color of fresh raspberries! It's so perfect.

Let me know if you have questions in the comment section - it makes different amounts depending on if you slice it into squares or rectangles but this recipe is definitely enough to feed a crowd of around 8-10 people. 
Picture
What you need:
For the crust
  • 8 oz graham crackers (gluten free ones will work too)
  • 1/4 cup melted vegan butter
  • 2 tbsp honey or maple syrup
For the filling
  • 16 oz vegan cream cheese (I used Daiya bc it's nut free)
  • 3/4 cup full fat coconut milk
  • 1 tsp vanilla extract
  • 1 tbsp fresh lemon juice
  • 1/4 cup maple syrup
For the raspberry puree
  • 8 oz chilled raspberries 
  • 1 tbsp lemon juice
  • 2 tbsp honey or maple syrup
  • 2 tbsp Vital Proteins collagen powder
What to do:
  1. Preheat the oven to 350 degrees F.
  2. Form the crust by blending the graham crackers,  butter and honey or maple syrup in a food processor until it starts to stick together a bit.
  3. Line a deep 8x10 baking pan with parchment paper and spray or rub any exposed edges of the pan with coconut oil. (This recipe also works with a mini 8x4 baking dish - just results in a little thicker layers!)
  4. Press the crust down into the pan so that it's an even flat layer and bake in the oven for 12 minutes at 350 degrees F.
  5. Stick the finished crust in the freezer immediately so that it's cool once you're ready to add the cheesecake filling.
  6. Blend the cheesecake filling ingredients in a food processor or stand mixer with the whisk attachment until smooth. Add the filling to the baking pan on top of the cooled graham cracker crust, spread it out evenly and then put the pan back in the freezer for at least an hour.
  7. Add the chilled raspberries, lemon juice, honey or maple syrup and collagen powder to a blender and blend until combined. Add it on top of the chilled cheesecake and spread it out into an even layer.
  8. Return the whole thing to the freezer for 3 hours or overnight before removing it and slicing to serve! LET IT THAW for at least 15 minutes before slicing it up. Crucial because it breaks apart if it's too hard and frozen. (Learned the hard way lol.)
1 Comment

Tomato Sauce with White Wine, Shallots and Garlic

5/15/2020

3 Comments

 
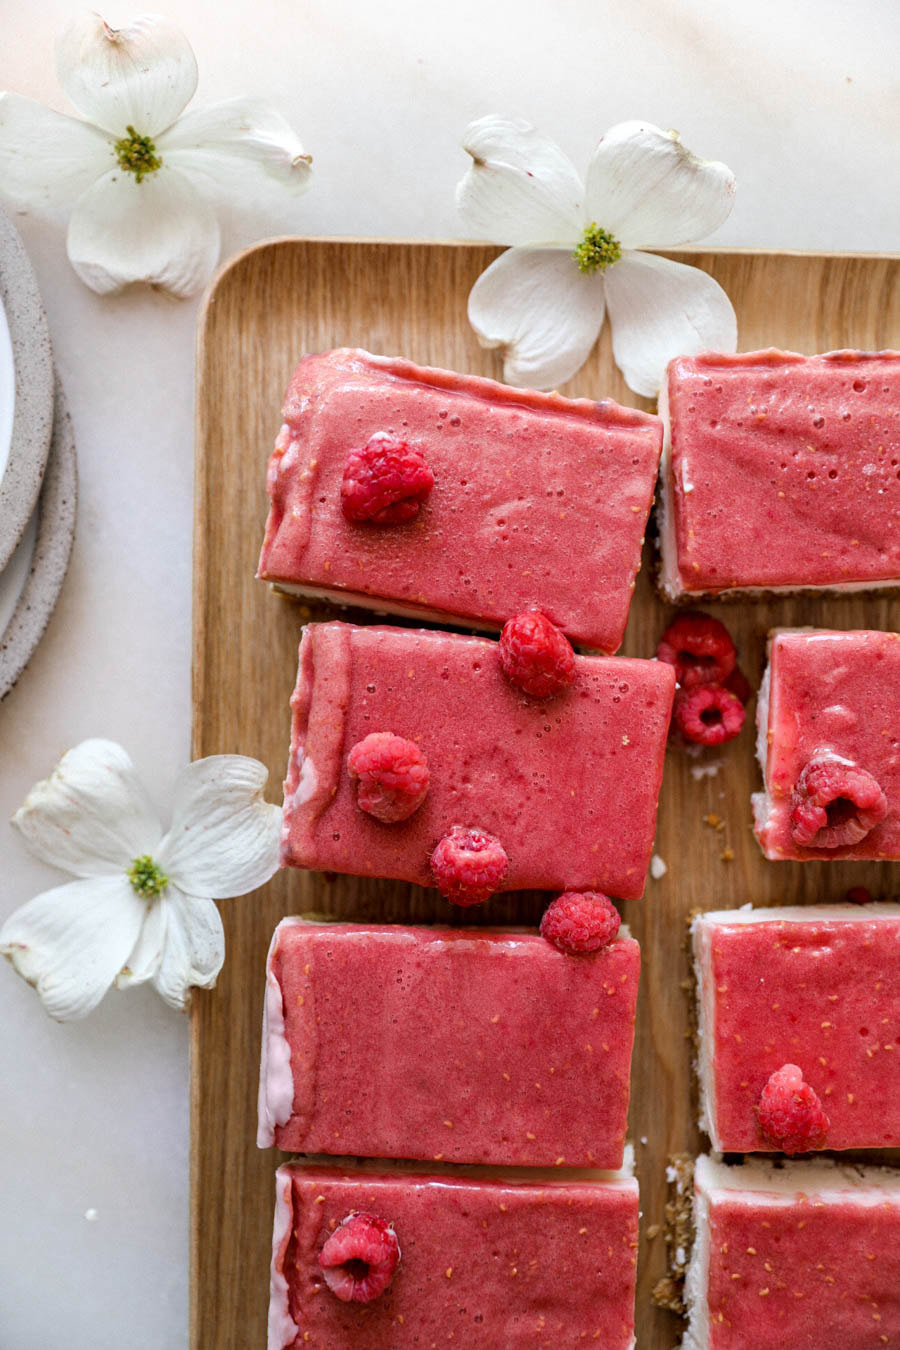
 Why is alcohol so good? I mean of course having a glass is amazing but I'm also talking about in food...because , some of my most favorite pasta sauces have either wine or vodka in them.

I was making my vodka sauce the other day with white wine (since I was out of vodka) and I was tempted to skip the last step of adding heavy cream to it and eat it how it was in the skillet because it just looked so pretty and smelled so good. So the next day, I did just that and here we are! SO this is basically my vodka sauce minus the cream and butter with wine + fresh garlic and shallots living in the sauce. You could leave the diced garlic and shallot as is in the sauce for texture or puree them like I did for a smoother sauce.
Picture
What you need:
  • 1/2 lb pasta
  • 2 tbsp extra virgin olive oil
  • 1 shallot, diced
  • 2 garlic cloves diced
  • 3/4 cup white wine (I used Kim Crawford Sauv Blanc)
  • 3 tbsp tomato paste
  • 3 tbsp reserved pasta water
What to do:
  • Cook the pasta in salted boiling water for as long as the package instructs. 
  • Heat the olive oil in a large skillet and cook the onions and garlic in it until translucent (around 5 minutes.) Add the tomato paste in halfway through and spread it out over the surface of the skillet.
  • Once the tomato paste is a brick red color and the onions/garlic are translucent, add the wine and whisk everything to combine. You should see some of the wine evaporate right away or else your heat wasn't high enough.)
  • Transfer the sauce into a food processor and blend until smooth. Return to skillet. (Not required but suggested for a smoother sauce texture.)
  • Switch the stovetop heat to its lowest setting and stir the sauce every few minutes until the pasta is done cooking. (If it's thickening up a ton you can add a tablespoon more of wine to it and maybe switch it to another stovetop station that's less powerful.)
  • Reserve a few tablespoons of the salty/starchy pasta water and add it into the sauce to loosen it up a bit. Add the cooked pasta to the sauce, mix and serve hot.
  • Note: if you didn't salt your pasta water enough you. may need to season the finished product with a little salt.
3 Comments

Kimchi Noodles

5/14/2020

0 Comments

 
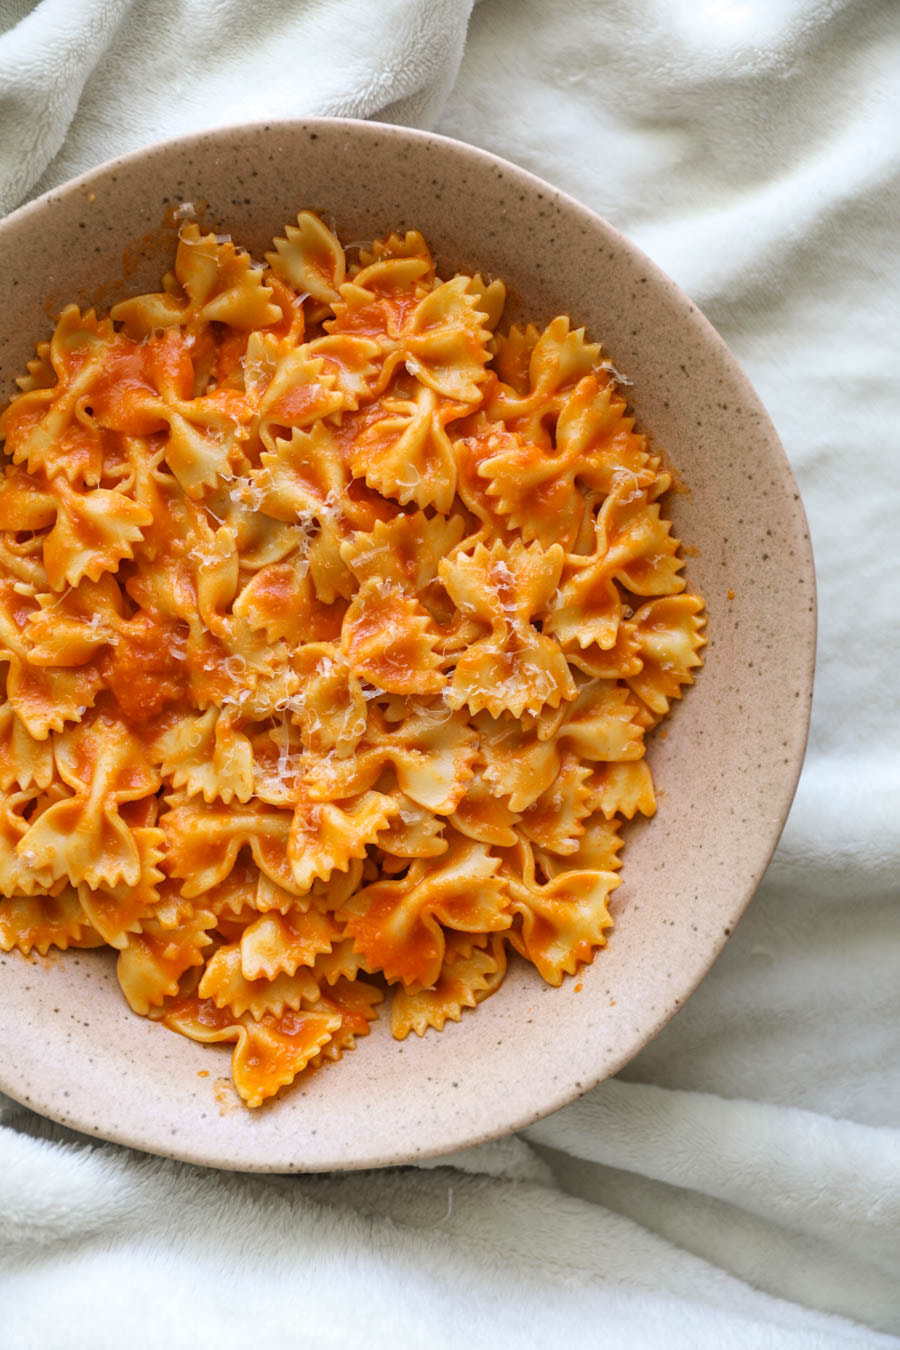
Korean glass noodles were my first Asian-noodle obsession aside from the more common stuff like lo mein or rice noodles. There used to be a restaurant in the Tremont neighborhood of Cleveland called BAC and I would go at least once a month to order their spicy kimchi dish. I remember it being so spicy that I could only take a few bites at a time and would have to wait a little before having more lol. So the good thing about making it at home is that you can control the level of heat you put into it.

Anyways, I found glass noodles at a nearby Asian supermarket and they ended up becoming the main ingredient of my Spicy Noodle Soup recipe that won Zoup Soup's National Recipe Contest in 2015! #funfacts

The noodles are made from sweet potato starch so they are naturally gluten free and vegan!! You could add protein to the dish but my favorite way to eat the dish is with veggies, kimchi and spicy sambal oelek. If you've never had sambal oelek, it's a chili paste that gives a pretty hard kick to any dish - I have it listed on my favorite products page on Amazon so tap here if you want to order some! The glass noodle brand I use is also available on Amazon and on my favorite products page, click here to order them!
Picture
What you need:
  • 6 oz Korean glass noodles (1/2 of the package on my Amazon page)
  • 2 tbsp vegetable oil
  • 1 red bell pepper
  • 1/2 onion
  • 2 garlic cloves
  • 2 handfuls of snow peas
  • 3-4 scallion stalks
  • 1/2 cup kimchi
  • 1-2 tbsp sambal oelek 
What to do:
  1. Bring a pot of water to a boil and cook the glass noodles in it for 10 minutes.
  2. De-seed the red pepper and slice it up into long pieces. Cut the onion into long pieces as well.
  3. Cook all of the veggies stir-fry style in a large skillet or wok on medium heat with 2 tbsp vegetable oil for 5 minutes.
  4. Add the kimchi and sambal oelek into the stir fry, I like to add in some of the juice from the kimchi jar as well for more flavor - about 2-3 tablespoons.
  5. Add the cooked noodles to the cooking veggies. Stir until completely mixed together and then serve hot! 
0 Comments

Banana Bread Cookie Bars with Dark chocolate + Sea Salt

5/13/2020

2 Comments

 
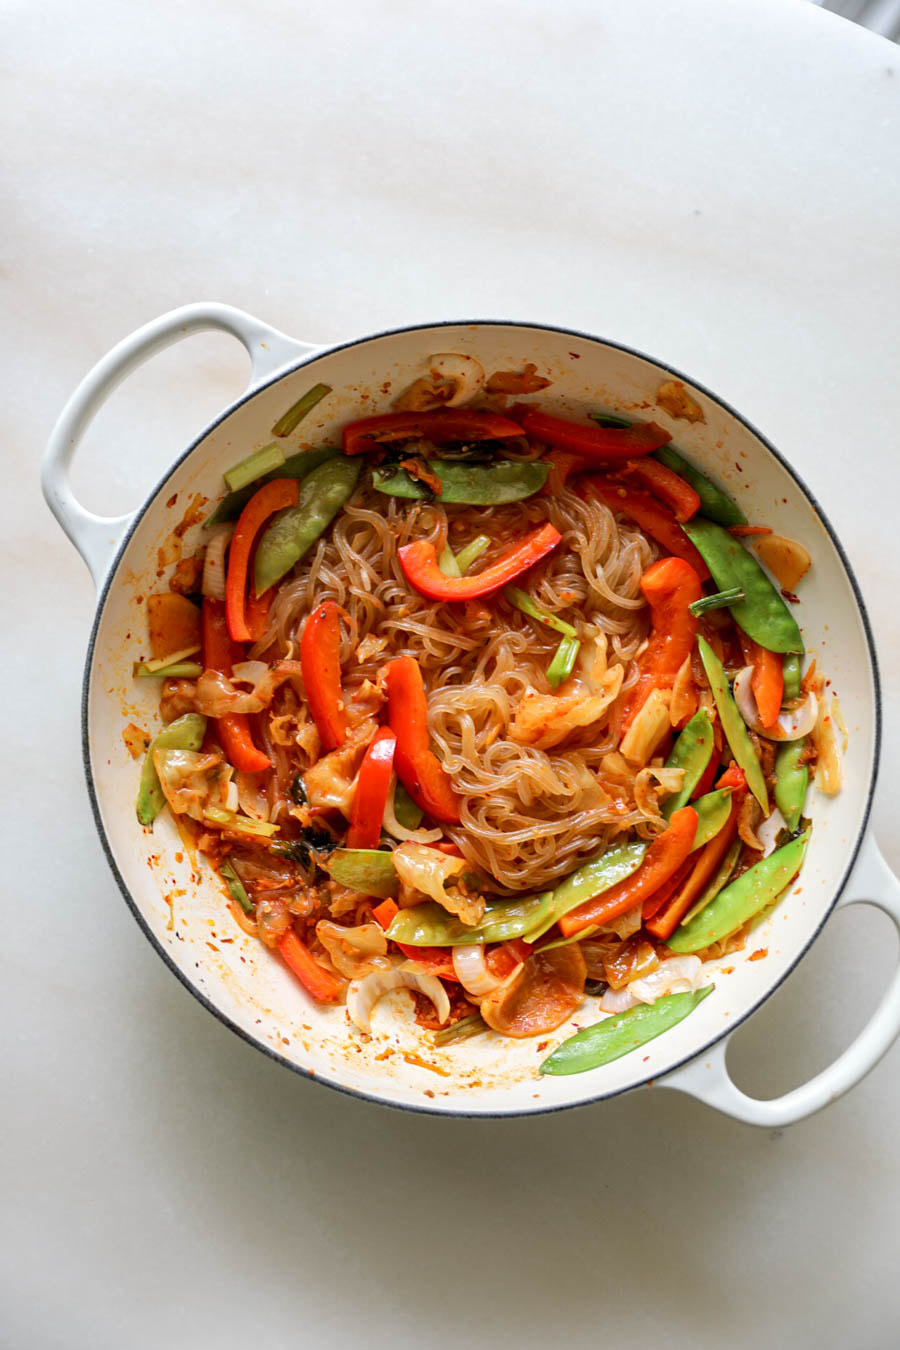
So here's what you can do with all of that quarantine banana bread you've been busy baking. You're welcome. They're also completely gluten-free and nearly vegan besides the egg I used in the banana bread which you could easily sub out for a flax egg. Feel free to change it around to whatever way you prefer to eat!

Layer one: Gluten free graham cracker crust with honey and butter.

Layer two: Mashed gf banana bread + raw banana + coconut butter, maple syrup and collagen power.

Layer three: Melted dark chocolate and flakey sea salt.

If you're looking for a stronger banana flavor to be present amongst all the other flavors and also want the banana bread portion of the bar to more like batter than bread, you can add one mashed banana to the banana bread crumbles.

​I used a ton of different products that are my favorite so I'll list them here incase you want to use the same thangs! Pamela's gluten free honey grahams, Melt Organic vegan butter, Vital Proteins unflavored collagen powder, Bob's Red Mill old fashioned rolled oats and then Eating Evolved's coconut butter. (Since I can't eat nuts I love using coconut butter or @avokween's granola butter in place of almond or cashew butter.)
Picture
What you need:
  • 8 oz graham crackers (about 12 squares)
  • 1/4 cup organic honey
  • 1 tbsp vegan butter
  • 2 cups crumbled banana bread
  • 1 ripe banana (if you want a more batter-like center)
  • 2 tbsp maple syrup
  • 2 tbsp coconut butter
  • 1 tbsp coconut flour
  • 1 tbsp unflavored collagen powder
  • 1 dark chocolate candy bar
  • 1 tbsp coconut oil
  • 1 tbsp Flakey sea salt for topping
What to do:
  1. Pulse the honey grahams, honey and butter in a food processor until it starts to stick together a little bit. If it's not sticking, add in an additional 1 tbsp honey.
  2. Transfer the graham cracker mixture to a bowl and mix in 1/3 cup of old fashioned rolled oats.
  3. Line an 8x10 oven safe (deep) dish with parchment paper and spray PAM or rub veg oil on any corners or sides that the paper doesn't cover. (I used my 8x10 Detroit Style Pizza Pan.)
  4. Smoosh and spread the graham cracker crust down into an even layer in your baking dish. (I turned a smooth cup sideways to roll over it like a rolling pin.)
  5. Bake the graham cracker crust at 350 degrees F for 15 minutes until firm and mostly hardened.
  6. If you want the more batter-like center, mash the lone banana in a bowl so that you can mix it into the banana bread crumbs.
  7. Grab some banana bread slices pulse in a food processor until it turns into crumbs. (I used slices from my Gluten Free Banana Bread recipe.) 
  8. Transfer the banana bread crumbs to a bowl and mix the coconut flour, banana bread crumbs, maple syrup, coconut butter and collagen powder. Dump the banana bread mixture on top of the cooked graham cracker crust and flatten it into an even layer.
  9. Break a dark chocolate bar into pieces and place in a bowl with the coconut oil. Microwave for 30 seconds and stir. Microwave for another 30 seconds and stir again. Once there aren't any chocolate lumps and the chocolate has completely melted,  pour it over the top of the banana bread layer and spread it out evenly.
  10. Top with sea salt and then stick it in the freezer to set for at least 15 minutes.
  11. Carefully remove the goods from the dish and then slice into either bar or bite sized pieces before serving. Keep in the fridge for up to a week.
2 Comments

Healthy White Bean Pasta Sauce

5/12/2020

0 Comments

 
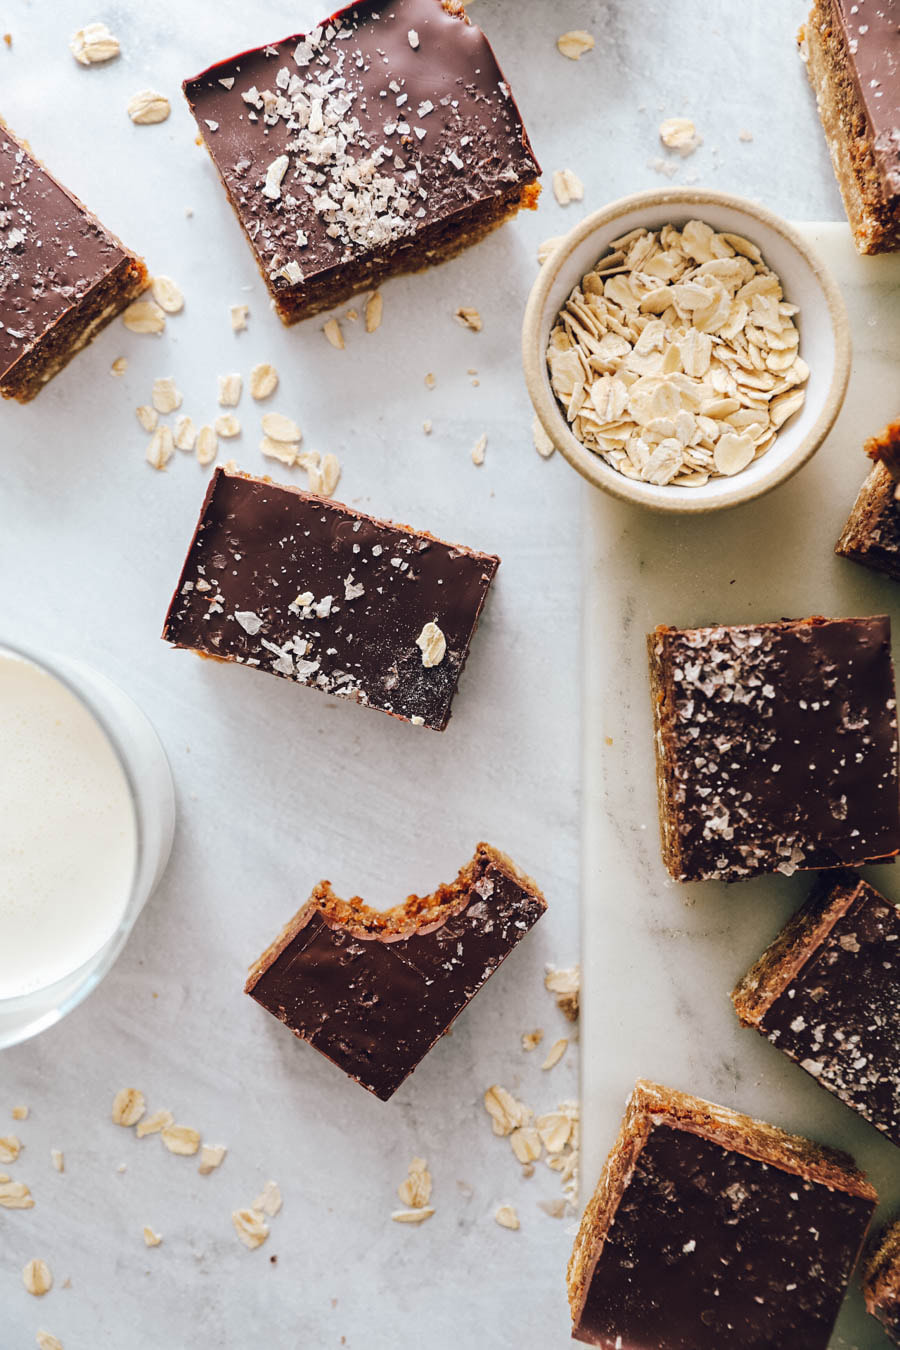
If you told my former self that I would one day be eating a pasta sauce made out of beans I would probably run away. Lol. Jk. BUT, I grew up absolutely hating any and every sort of bean!

Turns out, I love them now. Also turns out, they can add a super creamy texture to sauces once they are pureed. The end result for this dish sort of tastes like alfredo but it's waaaay better for you because even though there's still a decent amount of parmesan cheese in there, there's no heavy cream or dairy besides that. Cannellini beans are full of fiber, folate, iron and magnesium so it's a great way to sneak some good stuff into your diet.

As far as subs, you could replace the parmesan cheese wit nutritional yeast to make it vegan or sub out the wheat pasta for brown rice pasta to make it gluten free!
Picture
What you need:
  • 1/2 lb pasta (I used mafaldine)
  • 12 oz cannellini beans (I used Jovial Foods 100% organic - soaked overnight and pressure cooked)
  • 1 large garlic clove (or 2 smaller ones)
  • 1/4 cup oat or rice milk
  • 3/4 cup parmesan cheese
  • 1 tsp fresh cracked black pepper
  • 1/4 cup reserved pasta water

What to do:
  1. Cook the pasta according to package instructions in salted boiling water.
  2. Blend all the other ingredients in a food processor until smooth. 
  3. When the pasta is almost done, scoop out 1/4 cup of the pasta water and add it into the bean sauce.
  4. Pour the sauce over the freshly drained pasta, top with more parm and pepper and eat.
0 Comments

Pad See Ew

5/12/2020

0 Comments

 
This is hands down my favorite dish to order from any Thai restaurant I visit. Everyone else seems to go straight for the pad thai but not me! It's traditionally made with fresh, flat wide rice noodles but if you're in a pinch and don't feel like heading to a Thai supermarket to find them you can use dried rice noodles too. (That's what I did, click here to see the brand I use on my Amazon shopping page!)

If you're not an Asian food freak like me you probably don't have oyster sauce or dark soy sauce at home. Those can be ordered on Amazon as well, I have the brands I prefer on my Amazon shopping page too!
Picture
What you need:
  • rice noodles
  • A handful of Leafy greens, I prefer Chinese broccoli or bok choy
  • 1-2 eggs depending on how much you want in your dish
For the sauce
  • 2 tbsp oyster sauce
  • 2 tbsp dark soy sauce
  • 2 tbsp water
  • 1/2 tbsp soy sauce
  • 1/2 tbsp white vinegar
  • 1/2 tbsp sugar
What to do:
  1. Bring a large pot of water to a boil and cook the rice noodles according to package instructions.
  2. Whisk together all of the sauce ingredients in a bowl and set aside.
  3. Cook the leafy greens in a skillet until wilted and soft - about 6-7 minutes. Move them to the side and scramble the egg in the empty half of the skillet. Remove the eggs/greens and set aside.
  4. Turn the skillet heat up to high and combine the sauce and noodles in it so that the sauce caramelized over the noodles. Be careful as you toss it because rice noodles break easily. 
  5. After a minute of tossing, remove from heat and gently stir back in the greens and egg before serving.
0 Comments

Vegan Mac And Cheese (Healthier Version)

5/3/2020

1 Comment

 
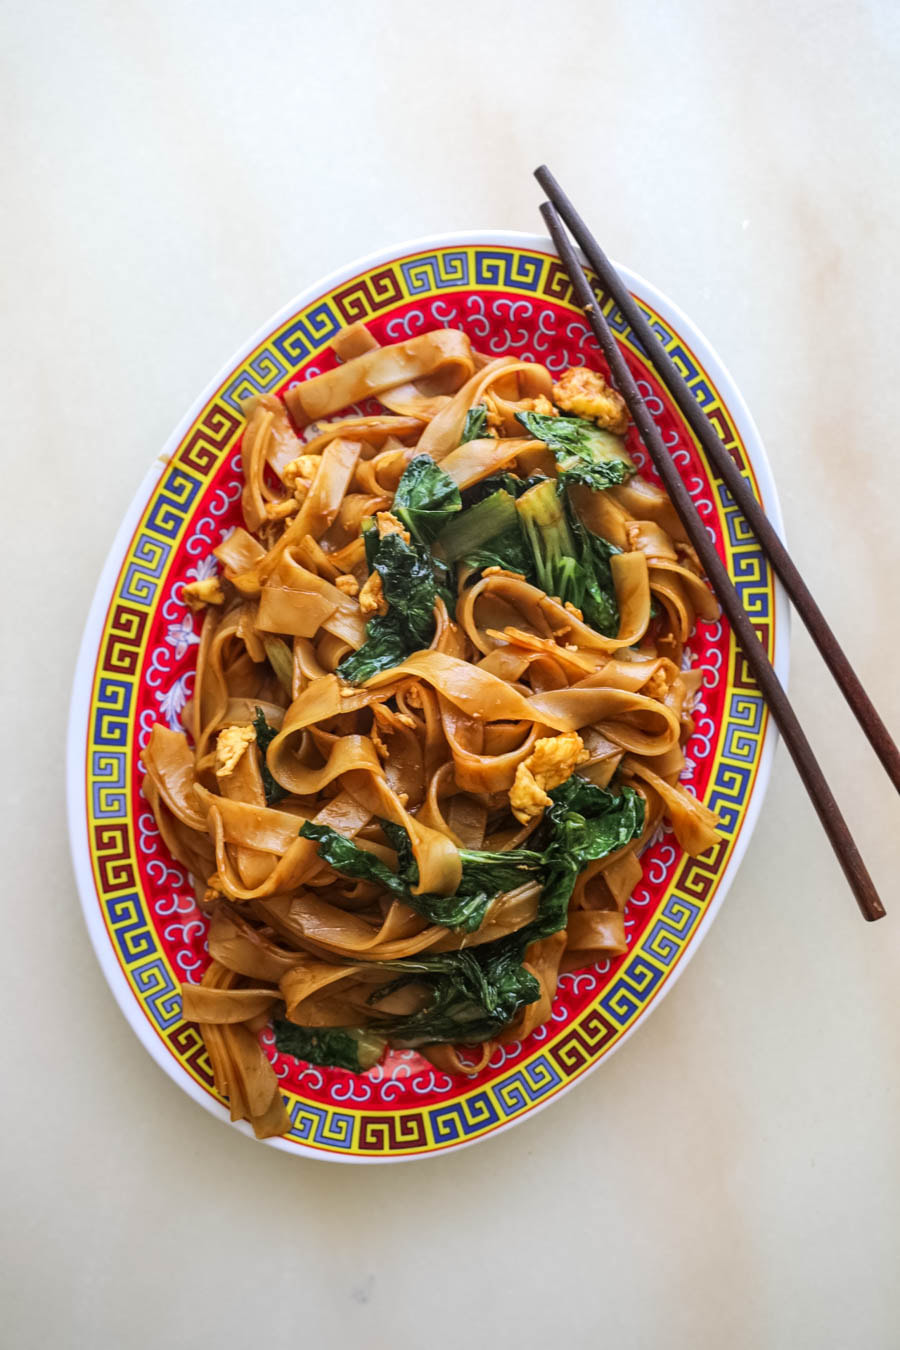
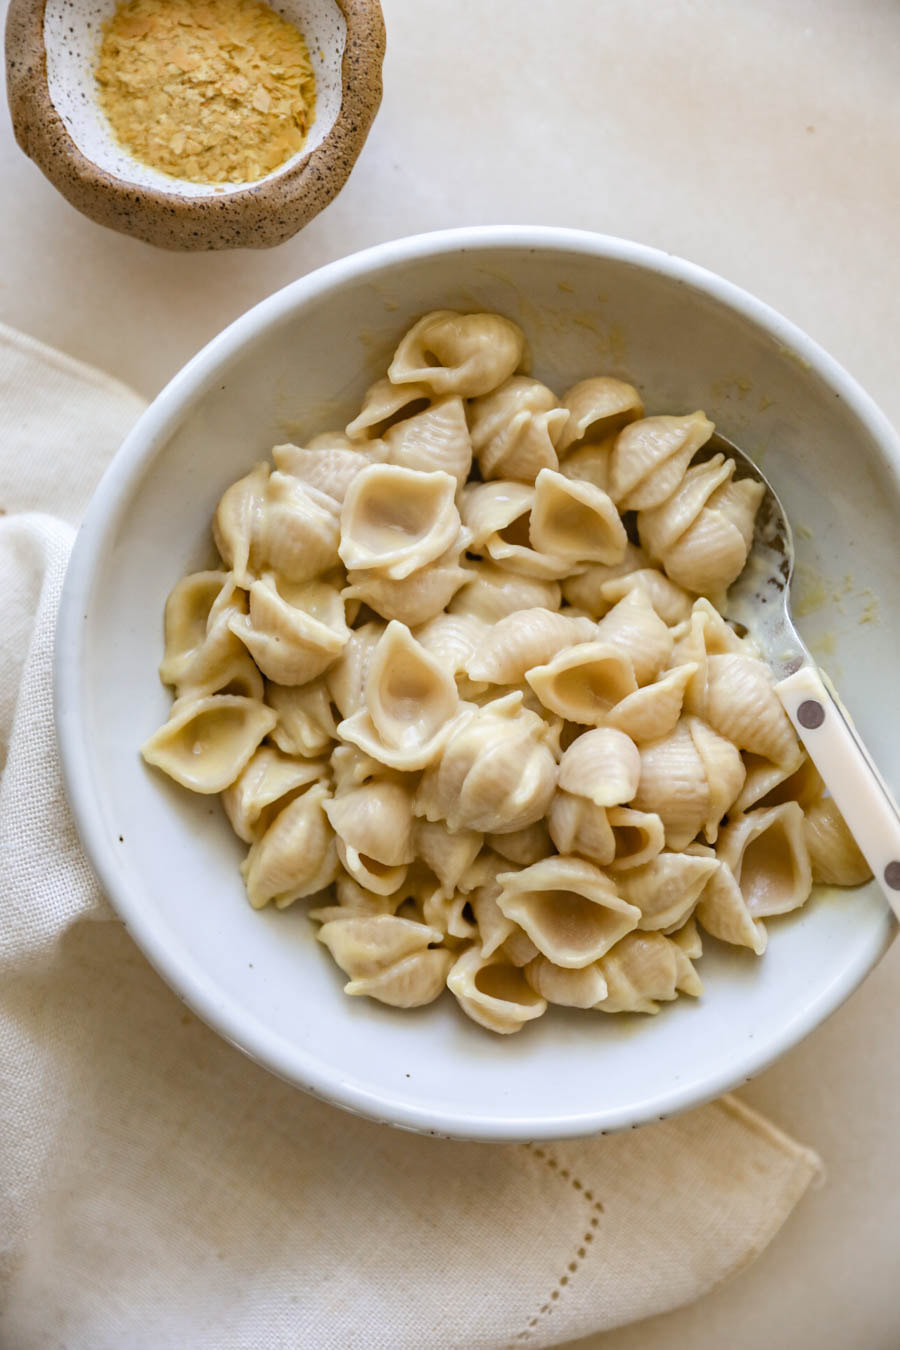
Okay so I now have two vegan mac and cheese recipes on my website. This one is more nutritious because of the pureed veggie ingredient + the nutritional yeast factor but it still remains nut free just like the other one! A creamy vegan mac and cheese recipe without cashews?? YEP. It might not be as beautiful as my other recipe but it's really good, better for you and WAY easier to make. If you're looking for my other recipe with actual vegan cheese in it, tap this link! Both are super good despite the fact that there's no dairy in either of them!

I also love how flex this recipe is. You could sub out the potato puree that I used for a number of things like butternut squash, sweet potato, carrots or cauliflower puree. As long as you turn whatever veggie you use soft enough via steaming or boiling to make sure that they completely blend into the sauce! I honestly considered adding some baby food to my next grocery list so I don't have to puree whatever veggies I plan to add in, LOL. 

I prefer to use potato because of the starch content in it - when using less starchy vegetables like BNS I add in a teaspoon of arrowroot starch to help it thicken better. (Also, be careful if you use frozen veggies because they have a bit more water content then fresh veggies do.)

This recipe makes enough for two but it can easily be cut in half for a personal version! I like making it for myself and saving half of it for another day.
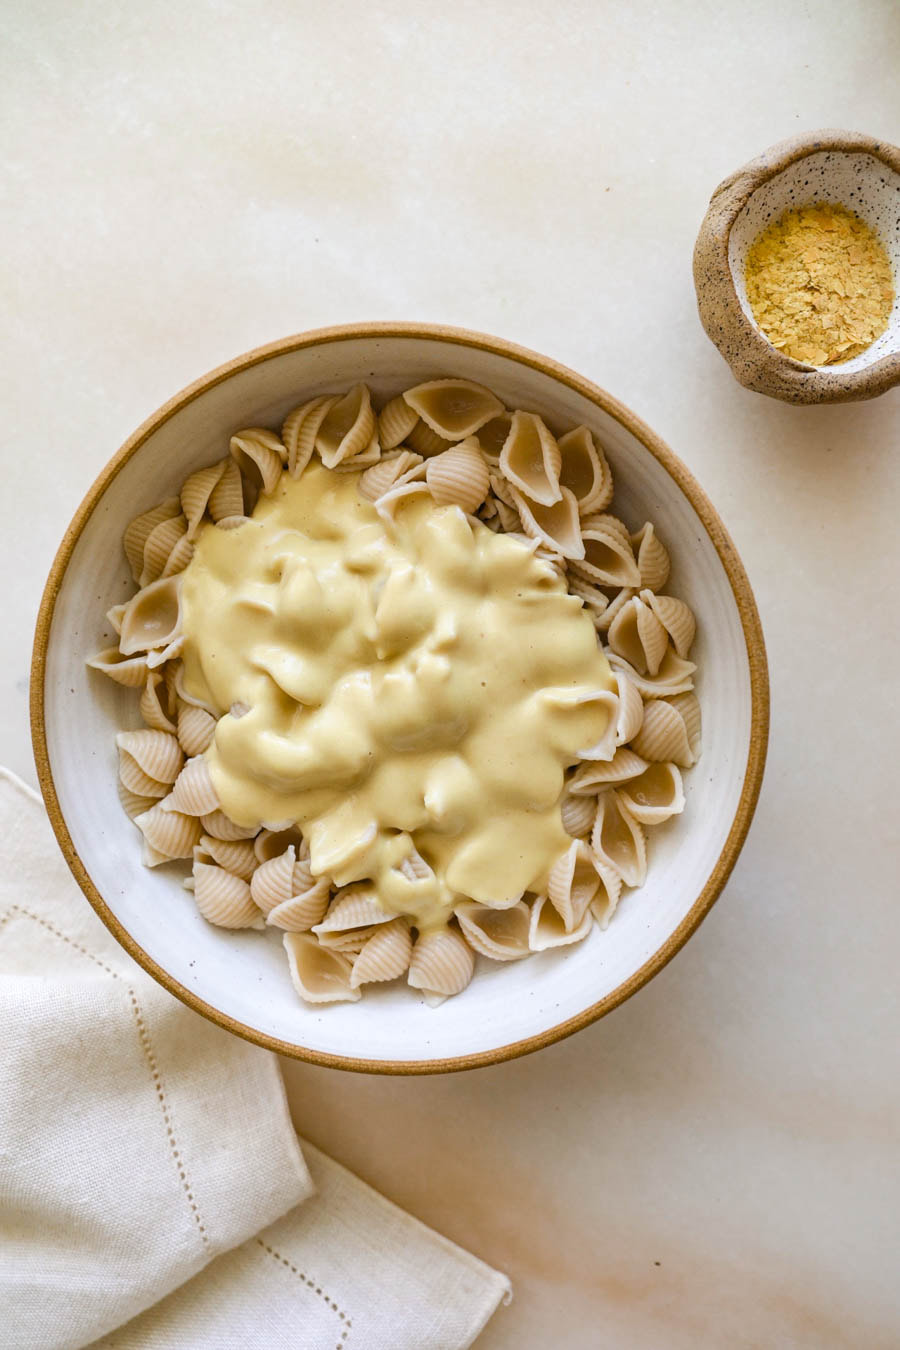
Picture
What you need:
  • 1/2 lb pasta (I used brown rice pasta)
  • 3 tbsp vegan butter
  • 1/2 cup oat creamer (I used nut pods)
  • 1/4 cup nutritional yeast
  • 1/2 tsp garlic powder
  • 1/2 tsp celtic sea salt
  • 1/2 cup pureed potato or butternut squash (or other similar veg - see suggestions above.)
  • 1 tsp arrowroot starch if needed. (See note above.)
What to do:
  1. Peel and cut a decent sized russet potato into cubes (1 potato will give you what you need for 1/2 cup potato puree) and boil in water for 10 minutes or until you can easily cut through it. Cook the pasta at the same time. 
  2. Blend everything together in a food processor until smooth and creamy before pouring it over the finished pasta. 
Picture
1 Comment

    Connect

    CONTACT FORM
    If you’d like to use my photos & recipes, please ask or link back to this site. Thank You.

    Calendar

    March 2021
    February 2021
    January 2021
    December 2020
    November 2020
    October 2020
    September 2020
    August 2020
    July 2020
    June 2020
    May 2020
    April 2020
    March 2020
    February 2020
    January 2020
    December 2019
    September 2019
    August 2019
    July 2019
    June 2019
    May 2019
    April 2019
    March 2019
    September 2018
    August 2018
    July 2018
    June 2018
    May 2018
    April 2018
    March 2018
    February 2018
    January 2018
    December 2017
    October 2017
    August 2017
    May 2017
    April 2017
    February 2017
    December 2016
    November 2016
    June 2016
    April 2016
    January 2016
    June 2015
    April 2015
    March 2015
    February 2015
    January 2015

    RSS Feed

FOODS OF JANE

mostly noodles
foodsofjane, llc  |  © Copyright 2021 |  Contact@FoodsOfJane.com

  • Home
  • Recipes
  • CLE
  • Contact