foodsofjane
  • Home
  • Recipes
  • CLE
  • Contact
  • Home
  • Recipes
  • CLE
  • Contact
Search

Pepperoni & Hot Honey Pizza

6/19/2020

6 Comments

 
I've discovered the most perfect pepperoni in the world. Introducing, Hormel Cup n' Crisps. Out of all the different kind of pepperoni meats I've tried with making pizza, this one is by far my favorite. They curl up so nicely into the perfect little cup to hold one of my other favorite pizza toppings of all time - spicy hot honey.
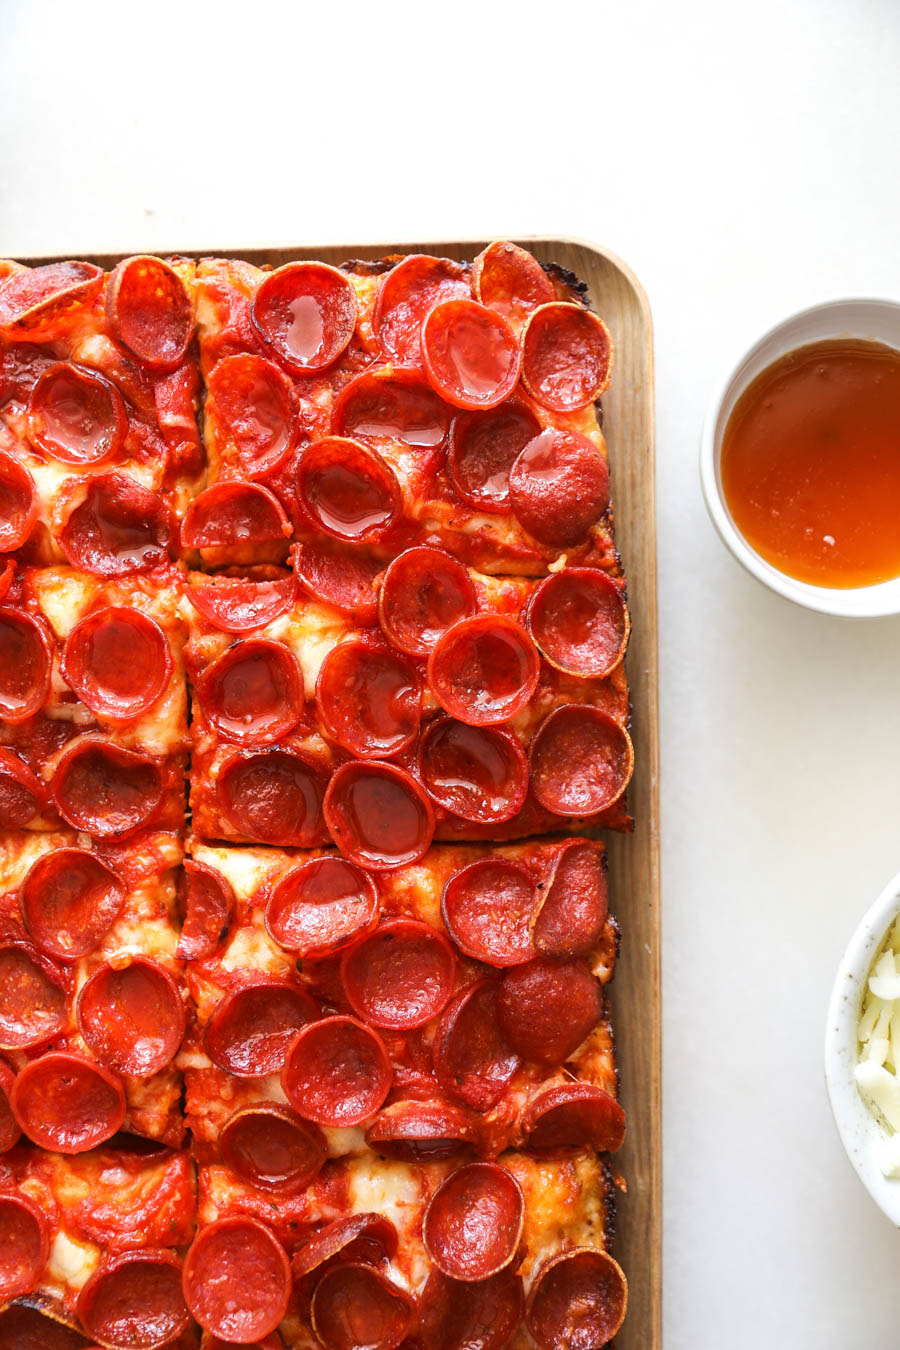
Picture
What you need:
  • 2 cups of bread flour
  • 1 tsp dry active yeast
  • 1 1/2 tsp salt
  • 1 cup room temp water but remove 1 tbsp of it before adding to flour
  • 1 tbsp butter for greasing the pan
  • 1 cup your fave pizza sauce
  • 1 cup low moisture thick shredded mozzarella cheese
  • 1 (5 oz) package of Hormel Pepperoni Cup n' Crisp
  • Spicy honey or you can use regular honey and red pepper flakes
What to do: 
  1. Add the flour, yeast and salt to a stand mixer and combine with a few turns of the dough hook. Add the water and mix on the lowest setting with the dough hook until a ball forms. Let that rest for 10 minutes.
  2. On the lowest speed setting, knead the dough with the dough hook for 10 minutes - the dough shouldn’t be sticking to the sides, only the bottom of the bowl.
  3. It should be kinda sticky unlike pasta dough, and silky. Remove the hook from the kneaded dough and set the dough in the bottom of the stand mixer bowl. Cover tightly and let rest for 2 hours in a warm place.
  4. Spread a tablespoon of room temp butter all over a 9x13 baking sheet.  Then spread out the dough. (It shouldn’t stretch all the way to the edges just yet, so do the best you can and then cover the dough in the baking sheet with saran wrap and let it rest for 30 more minutes.
  5. Preheat your oven to 550° F or as high as it can go. (Mine only goes to 525° F)
  6. After the dough relaxes for the 30 extra mins, spread it all the way to the edges and make sure it’s evenly distributed.
  7. Coat the pizza dough with a thin layer of your fave pizza or marinara sauce. Cover with cheese, all the way to the edges. (All the way to the edges is important for crisping the crust because the cheese melts and seeps down to crisp it all the way to the bottom of the pan.)
  8. Add a few additional dollops of pizza sauce to the on-top of the cheese, I do around 8-10 randomly but evenly distributed.
  9. Since the Hormel Cup n' Crisp pepperonis curl up so well, they will shrink in size, so it's important to use the whole packet of them to line the pizza. Overlapping is encouraged, and it should look overcrowded but don't worry it'll turn out perfect!
  10. Cook the pizza on the very bottom of the oven (not the rack, the actual oven) for 6 minutes. This achieves a crispy bottom crust! After the 6 minutes, move it up to the next level and lowest rack of your oven. This will finish off the melty cheese and crips up the pepperonis while preventing the bottom of the pizza crust to burn or blacken.
  11. Once you take it out of the oven, drizzle with either hot honey or regular honey and spicy red pepper flakes. Let it cook for a few minutes and the carefully transfer it to a cutting board to slice up and serve!
6 Comments

Chocolate Chip Cookie Dough Ice Cream Bars

6/16/2020

0 Comments

 
Here's the deal. The cookie dough recipe below is heavily influenced by what's on the back of the Toll House Chocolate Chip bag - that's what I grew up eating!! You could definitely use your fave cookie dough recipe or a healthier/gluten free blah blah cookie dough recipe - just make sure you replace the raw eggs with a liquid like an oil or milk and then bake the flour for 5-7 minutes at 350 F so that there's no raw ingredients that could contain bacteria. You also won't need any baking agents like baking soda because the dough won't be baked in an oven at all.

This recipe makes about 8 bars, or 16 small square bite-sized pieces.
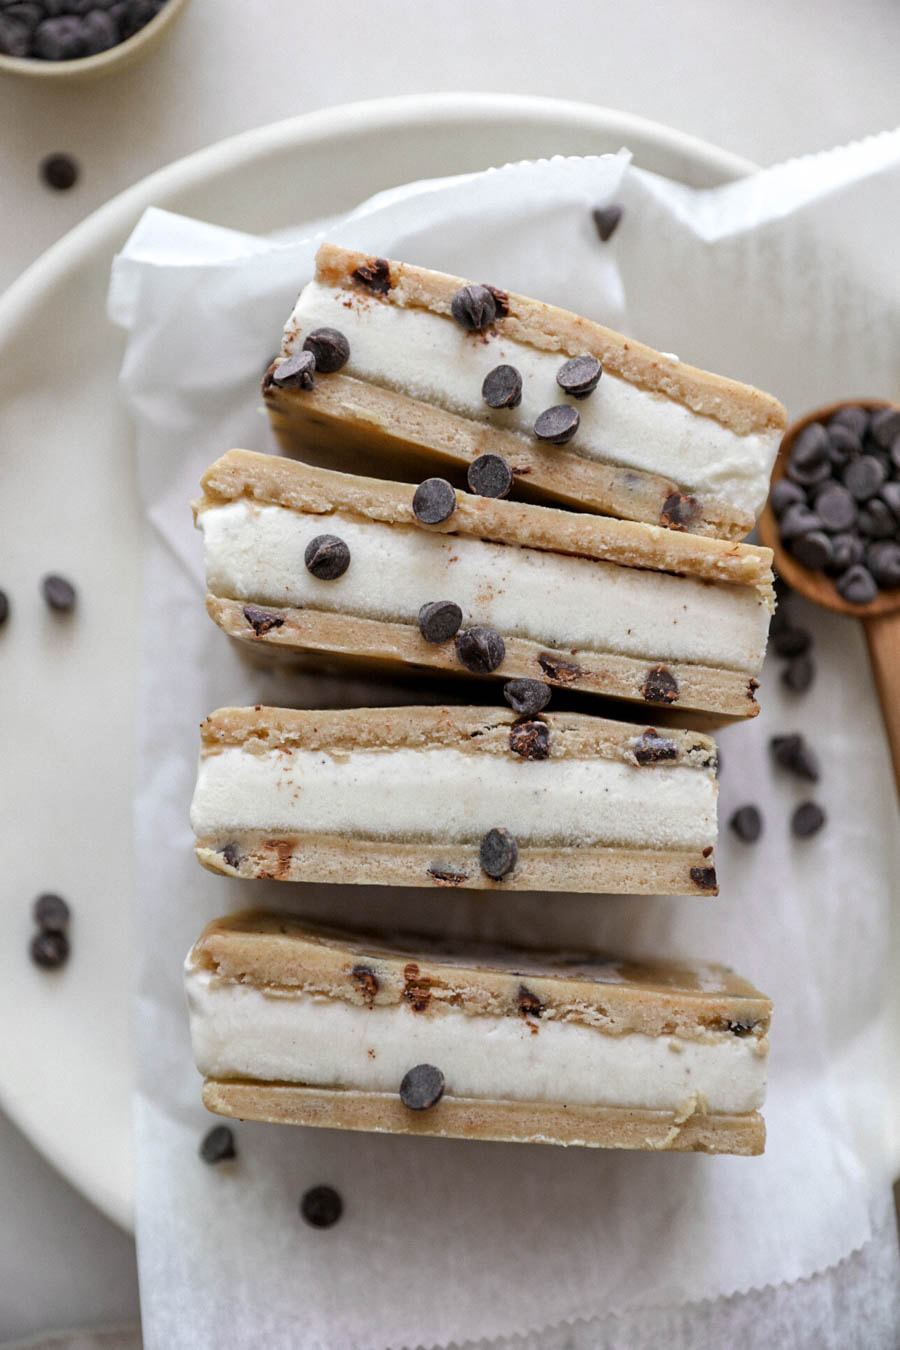
Picture
What you need:​
  • 2 cups flour
  • 1 tsp salt
  • 1 cup (2 sticks) softened butter
  • 2 tbsp whole milk
  • 3/4 granulated sugar
  • 3/4 cup packed brown sugar
  • 1 tbsp vanilla extract
  • 1 cup chocolate chips (I love Lily's Sweets)
  • 1 quart of vanilla bean ice cream
What to do:
  1. Take the ice cream out of the freezer and let it sit out in order to soften it.
  2. ​Pour the flour onto a cookie sheet and spread it around until it's distributed as flat and even as it can lay. Bake for 5-7 minutes at 350 F. This way you won't be consuming anything raw that might contain bacteria.
  3. Use the microwave or stove top to soften the butter. The butter should be 80% melted. Let it return to room temp before the next step or else it could be hot enough to melt the sugars which isn't good for the overall dough texture.
  4. In a large bowl, mix the softened butter with the sugars, vanilla and milk until combined.
  5. Slowly mix the flour into the sugars and butter, 1 cup at a time. *If the batter seems too dry, add canola oil 1 tbsp at a time until you get a cookie dough batter texture.
  6. Mix in the chocolate chips and if you're like me, eat a handful of them while you're doing it lol.
  7. Split the dough in half so that there's two identical sized portions of dough and roll each one out as best you can into a flat 9x9" square shape.
  8. Take a piece of parchment paper and place it in the bottom of a 9x9" square pan so that the edges are sticking up and out of it. (This helps you to easily lift the finished product out of the pan at the end without ruining it.)
  9. Next, fit one of your cookie dough squares as best as you can into the bottom of the pan until it's stretched to the edges and lays evenly. Stick it in the freezer for 20 minutes in order to make it a bit more firm.
  10. Remove the layer of cookie dough from the pan, cover it and put it away in the fridge until later. (Now you have that part ready and sized for the top when the time comes.)
  11. Take the other square of cookie dough that you rolled out and place it in the bottom of the pan on top of the sheet of parchment paper. Press down to make it fit evenly and then freeze for 20 minutes to firm up a little bit.
  12. Add the ice cream on top of the cookie dough layer. The ice cream should be pretty soft and melty, but not totally liquid. Use a spoon or icing spreader to slather it around and make it as even as possible. You want the layer of ice cream to be hard enough to hold up the top layer of cookie dough without it sinking into the melting ice cream. (If the ice cream layer seems too soft, stick the pan in the freezer for 20 minutes and then add the top layer of cookie dough.)
  13. Once the second cookie dough sheet is on top of the ice cream, let the whole thing freeze for 3 hours or overnight.
  14. Before eating, remove from the fridge and let it thaw for 6-8 minutes before removing it from the pan and slicing up!
0 Comments

SUmmer Corn Pasta

6/7/2020

3 Comments

 
I don't always put veggies into my pasta, but when I do...it's usually fresh summer veggies like corn! I used to make this recipe with rigatoni noodles but I think the sauce pairs better with a semi-wide longer shape like fettuccini, tagliatelle or mafaldine so I adjusted things according to that lil fun fact.

Also, this is optional but I really like when the corn is charred. (I didn't have enough time to char it the day I shot these photos!)
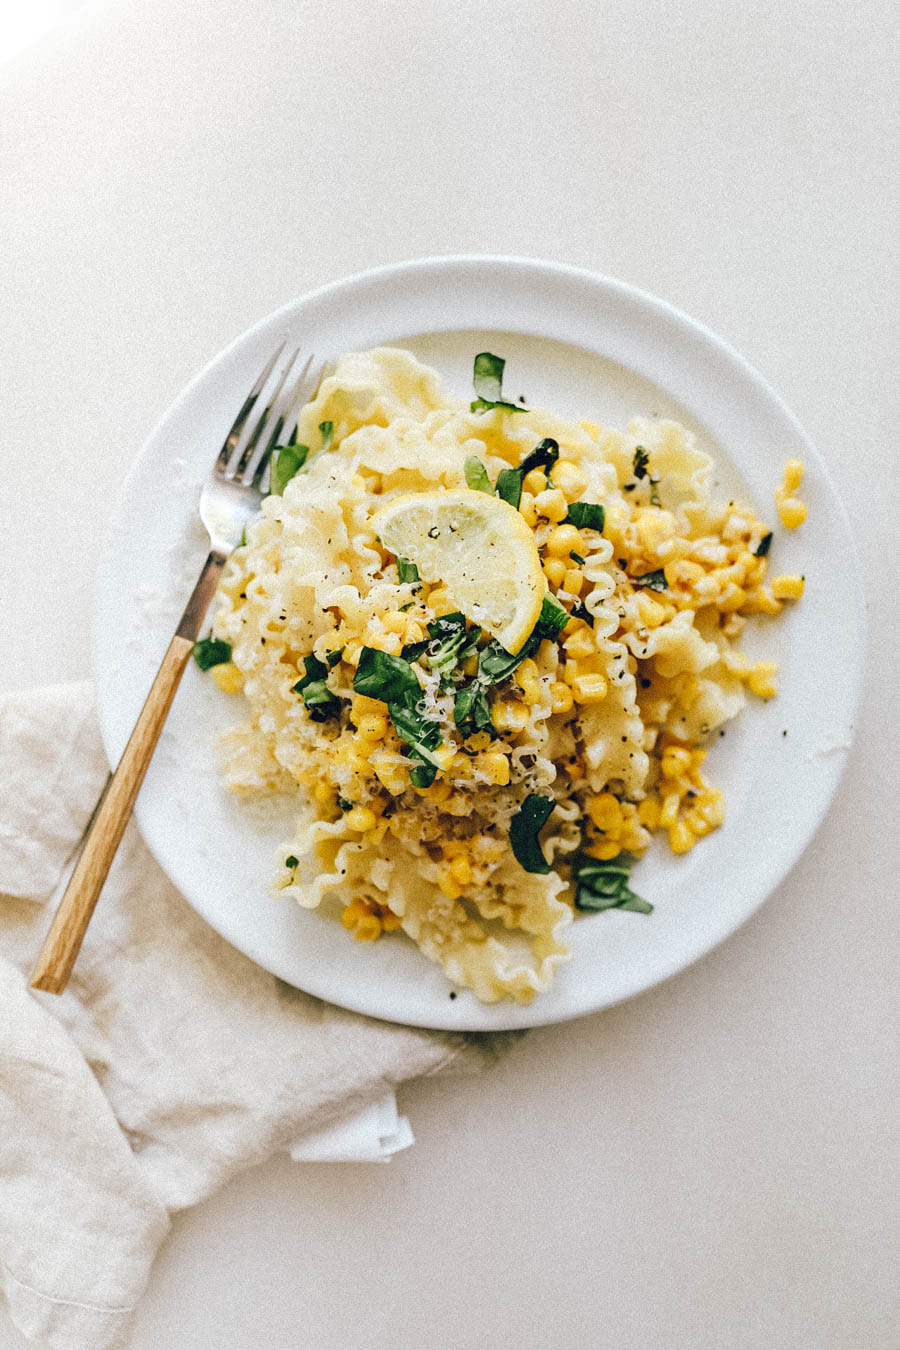
Picture
What you need:
  • 1/2 lb of pasta (I prefer mafaldine or tagliatelle)
  • 2 large or 3 small ears of fresh corn on the cob
  • 2 tbsp butter
  • 2 minced garlic cloves (or 1/2 tsp garlic powder)
  • 1/4 cup freshly chopped basil (I put half of it into the pasta and half of it on top)
  • 1/4 cup heavy whipping cream
  • 2 tsp lemon juice + more for topping
  • 1/4 cup freshly grated parmesan cheese + more for topping
  • Black pepper for topping
What to do:
  1. ​Bring a large pot of salted water to a boil and cook the pasta according to package instructions.
  2. Use a sharp knife to slice the corn off of the cobs. Toss the corn into a non-stick skillet with the butter and cook on medium heat until the corn starts to turn golden or charred depending on what you're going for.
  3. Toss the minced garlic and half of the basil into the hot skillet for a minute or two and then add the cream, lemon juice and parmesan cheese and combine with a whisk.
  4. Turn down the stovetop heat to super low and let the sauce simmer until the pasta is done cooking.
  5. Add the pasta to the skillet with the sauce and mix. I like to add in a couple tbsp of the starchy pasta water here too to loosen up the creamy sauce a bit.
  6. Before serving, top each dish with more parm, fresh basil, black pepper and a lemon wedge or lemon zest.
3 Comments

    Connect

    CONTACT FORM
    If you’d like to use my photos & recipes, please ask or link back to this site. Thank You.

    Calendar

    August 2022
    July 2022
    June 2022
    May 2022
    April 2022
    March 2022
    February 2022
    January 2022
    October 2021
    September 2021
    July 2021
    June 2021
    March 2021
    February 2021
    January 2021
    December 2020
    November 2020
    October 2020
    September 2020
    August 2020
    July 2020
    June 2020
    May 2020
    April 2020
    March 2020
    February 2020
    January 2020
    December 2019
    September 2019
    August 2019
    July 2019
    June 2019
    May 2019
    April 2019
    March 2019
    September 2018
    August 2018
    July 2018
    June 2018
    May 2018
    April 2018
    March 2018
    February 2018
    January 2018
    December 2017
    October 2017
    August 2017
    May 2017
    April 2017
    February 2017
    December 2016
    November 2016
    June 2016
    April 2016
    January 2016
    June 2015
    April 2015
    March 2015
    February 2015
    January 2015

    RSS Feed

FOODS OF JANE

mostly noodles
foodsofjane, llc  |  © Copyright 2021 |  Contact@FoodsOfJane.com

  • Home
  • Recipes
  • CLE
  • Contact