|
So excited to share a few of my favorite Easter recipes with you guys!!! I feel like Easter food is all about the carbs, cheese, ham and mustard. There's so many fun ways to incorporate all of those things into a holiday brunch or dinner spread!! I grew up eating cheesy potato casserole at every large family function - there were always trays and trays of it since our cousin clan totaled 22 small humans who LOVED their cheesy carbs!!! My Grandma would always make the most simple but delicious deviled eggs too and I just HAD to include that recipe alongside the others. 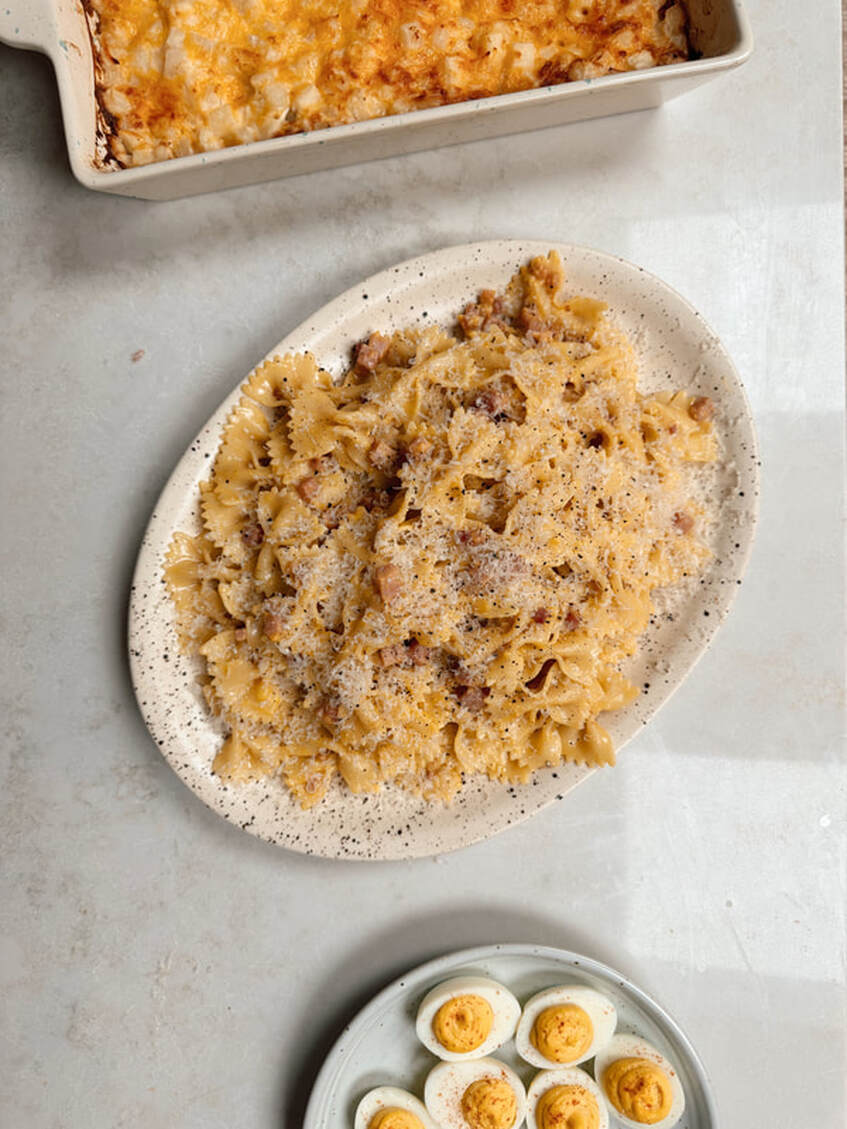 EASTER HAM CARBONARAI'm the biggest advocate for making pasta a priority at every holiday celebration. This is the most seamless and easy way to bring pasta to Easter brunch or dinner!! It's very similar tasting to real carbonara but has a fun festive twist to it!! I promise everyone will be going back for seconds. WHAT YOU NEED:
HOW TO MAKE:
CHeesy Potato CasseroleI'm pretty sure every single family has a variation of this recipe for holiday and family gatherings. I love that you can use frozen potatoes, it makes the whole thing so much easier (no thawing required!) Just make sure you get the potatoes that are cut up into tiny cubes, the texture is better than if you were to buy larger cubed or diced potatoes. WHAT YOU NEED:
WHAT TO DO:
Grandma Jeanne's Deviled EggsThese are not fancy deviled eggs!! Grandma Jeanne kept it very simple when it came to her deviled eggs and we loved her for that!! I honestly don't like fancy versions of deviled eggs and feel like they are truly meant to be a simple side dish amongst other complex flavors in the main dishes of holiday spreads!! WHAT YOU NEED:
WHAT TO DO:
0 Comments
I've made this recipe for my family several times, and finally have decided to write everything down and keep track in order to share it with all of you!! This is my go-to faveee meaty lasagna recipe!! Every time I make it, everyone who eats it raves about it and asks for the recipe. This lasagna recipe starts off with Brightland's Awake EVOO turned into a short cut bolognese sauce and ends up with layers and layers of saucy pasta and a cream cheese and ricotta filling. 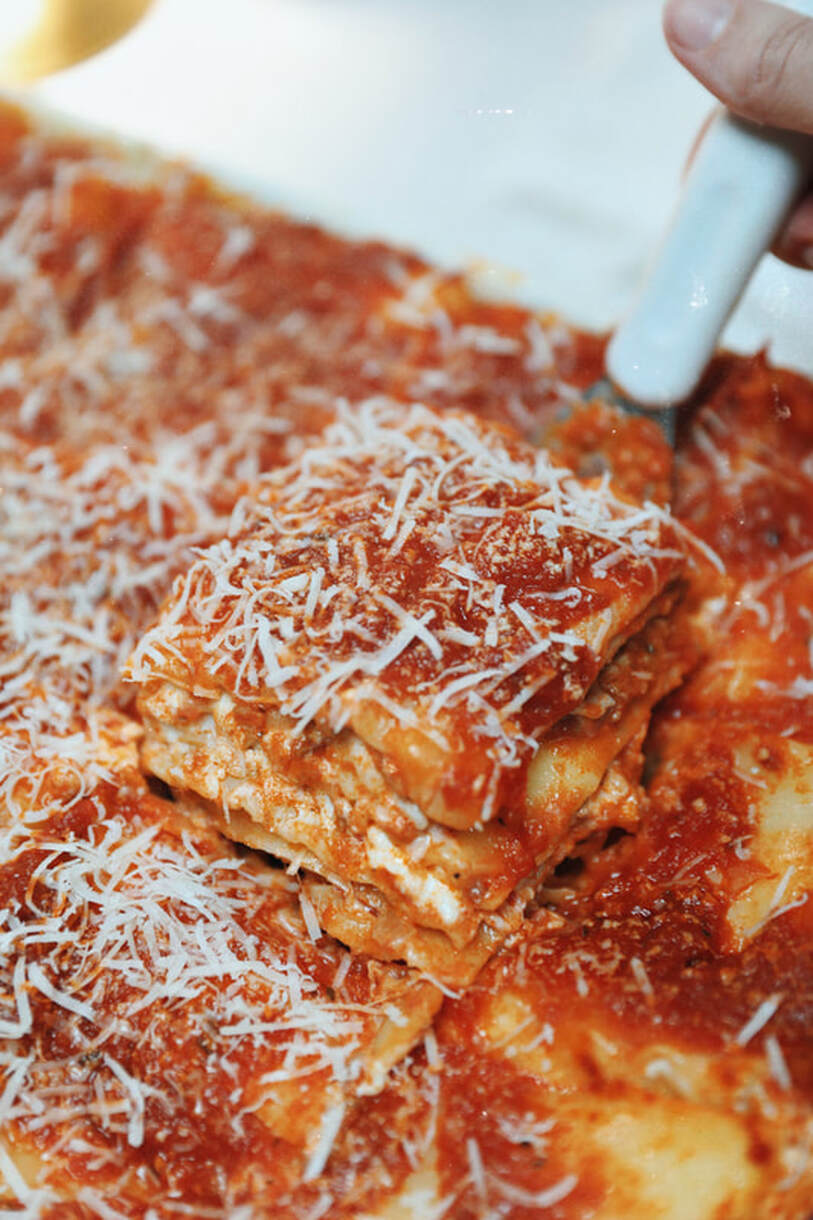 WHAT YOU NEED
WHAT TO DO
Prep Work: 1. Drizzle the Brightland EVOO into a deep skillet or pan and start cooking the ground meat by breaking it apart. Season it with salt and pepper. Once it's mostly separated and starting to turn brown, add in the onion, carrots, celery and garlic and cook for five-ish minutes until the veggies are fragrant. 2. Add tomato paste to the veggies and stir until everything is coated. Cook for about 5 minutes until the paste is caramelized and brick red in color. 3. Pour the white wine (or broth substitute) into the pot and cook until the liquid has decreased by half. This will deglaze things and add more flavor! 4. Add the jar of marinara to the pot and cover/let simmer for 20 minutes while you prep the filling and boil the lasagne sheets. (Make sure to properly salt your pasta water when cooking the lasagne! Crucial for good flavor!) 5. Combine the filling ingredients in a bowl and mix until fully combined. Lasagna Assembly: 1. Pour a generous amount of the bolo sauce into the bottom of a 9x13 baking dish. 2. Add a layer of the lasagne sheets. (I did 3 across.) 3. Add a layer of the cheese filling. 4. Add a layer of lasagne sheets. 5. Add a layer of bolo sauce. 6. Repeat steps 2-5 until you run out of lasagne sheets and fill the baking dish, you're going to want to end with a layer of the lasagne pasta on top. 7. Line the lasagne pasta sheets with the mozzarella slices. Pour the additional cup of marinara sauce on top of the cheese slices. (I like to melt the cheese under the sauce because I think it stays melty for longer that way instead of bubbling up into a hard shell.) Baking: 1. Cover the baking dish with foil and cook for 45 minutes at 350 degrees F. 2. Let cool off and set for 20 minutes before slicing into pieces and serving! Top each serving with parmesan and a drizzle of @brightland EVOO. This soup is everything!!! It's got a lot of vibes going on - it's giving chicken and dumplings, chicken pot pie AND chicken noodle soup. The gnocchi is the perfect soft and fluffy addition and the creamy factor really takes the whole thing to another level. So perfect for these grey winter months. TIPS: You CAN cook and shred your own chicken but I highly suggest using rotisserie chicken. It's just way juicer and there's so much more flavor to it. Also, the consistency of the soup may need adjustment depending on what thickener you use! For a thicker soup, you can always whisk in an additional pinch or two of your thickening agent. To thin the soup out, just add more broth. Recipe makes enough for 4 bowls, or 5-6 small cups of soup. 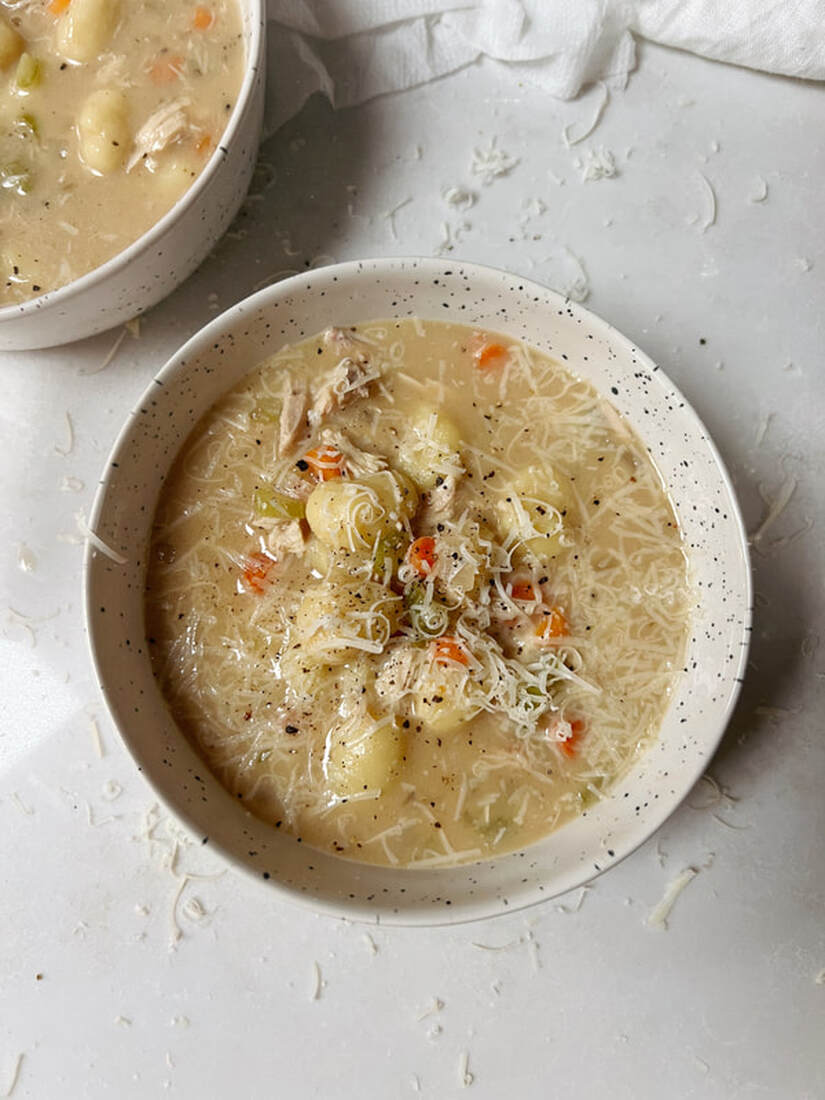 What you need:
What to do:
SO many requests for a recipe post with more details about how to make this soup!! If you're new here - I shared a vodka sauce lasagna recipe that went super viral on Instagram and TikTok. This recipe is a spin off soup version!! Very much like regular lasagna soup but with a little vodka sauce flavoring and flare! It's creamy, comforting and just perfect for anyone who lovessss a good pink pasta sauce. Recipe makes enough for 4 bowls, or 5-6 smaller cups of soup! 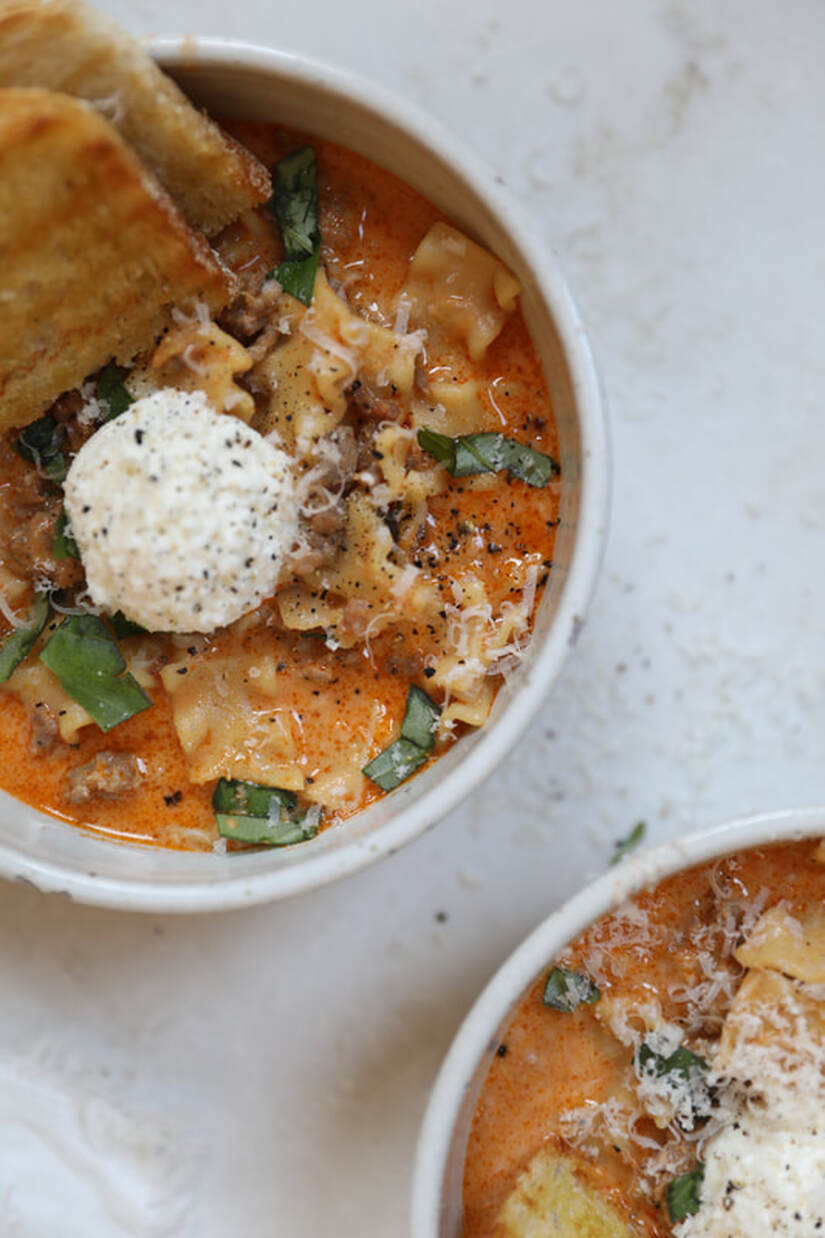 What you need:
What to do:
Just got back home from spending two weeks in the south, in Savannah, GA!! IYKYK, pimento cheese is everywhere down there and I was totally inspired to incorporate it into a few of my upcoming recipes. This recipe would be SUCH a good addition to a summer bbq - think macaroni salad but like next level and a little more fun! 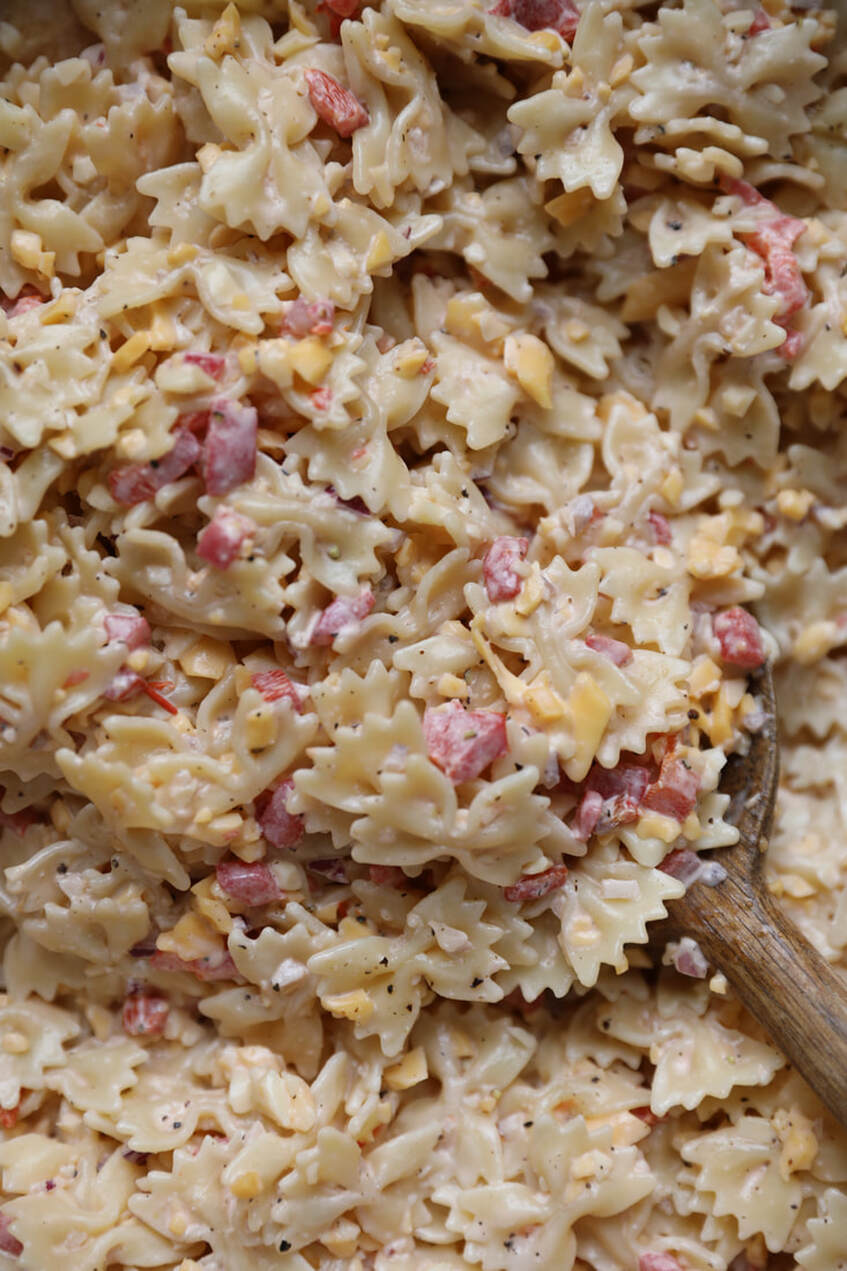 What you need:
What to do:
THIS PASTA IS SO GOOD. It's sort of like a creamy Italian sausage pasta but with a much different flare. I love the flavor of chorizo and it brings the perfect amount of heat to this creamy, dreamy pasta!! 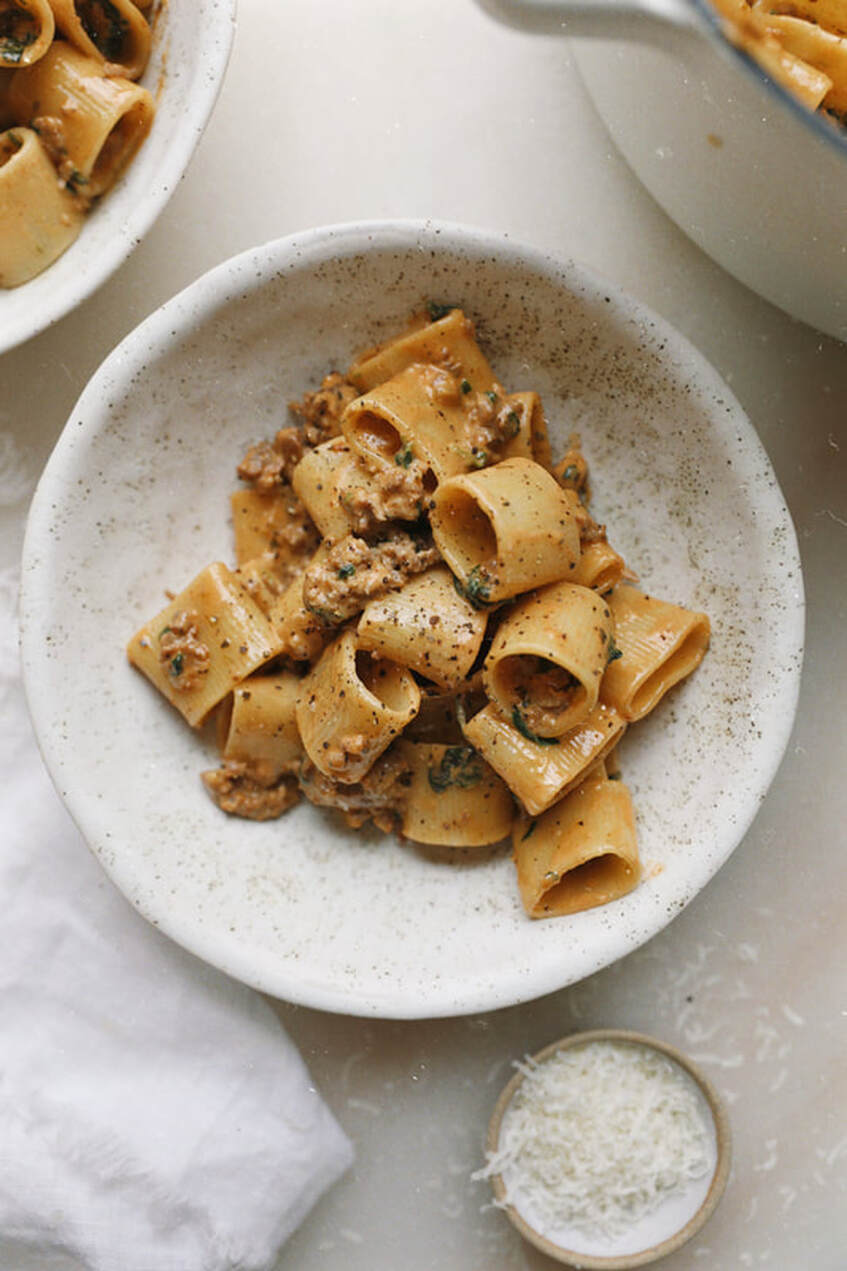 What you need:
What to do:
Every time I'm pregnant, I crave food from my childhood. Growing up, there were always stuffed shells on the table for dinner!!! I decided to get creative with the filling and ended up loving it so much!! The recipe made enough for an entire baking dish worth of stuffed shells, so this one is family-sized unlike my other recipes which are mostly for 2-3 people! 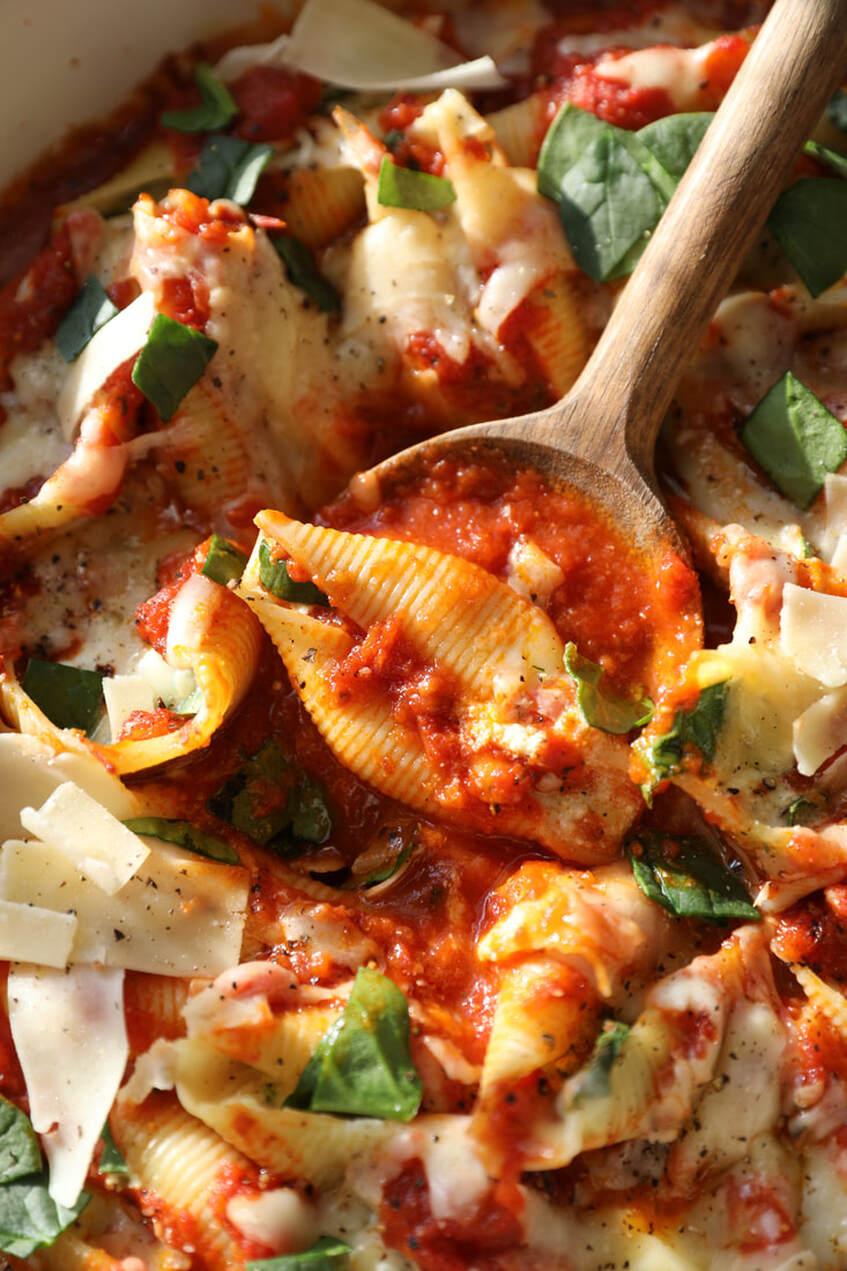 What you need:
What to do:
I struggled with what to title this one because I'm fairly certain this dish isn't a tried and true Tuscan pasta dish - but based off my experiences growing up in America, "Tuscan Chicken Pasta" is a very popular dish seen on menus at restaurants - at least in the Midwest. The components of this pasta dish are herb grilled chicken breast, parmesan cream sauce, sun-dried tomatoes, spinach and mushrooms. I love the flavors and would always order it as a child!! I don't make it all the time but every once in a while it hits the spot - it's a very nostalgic dish for me! 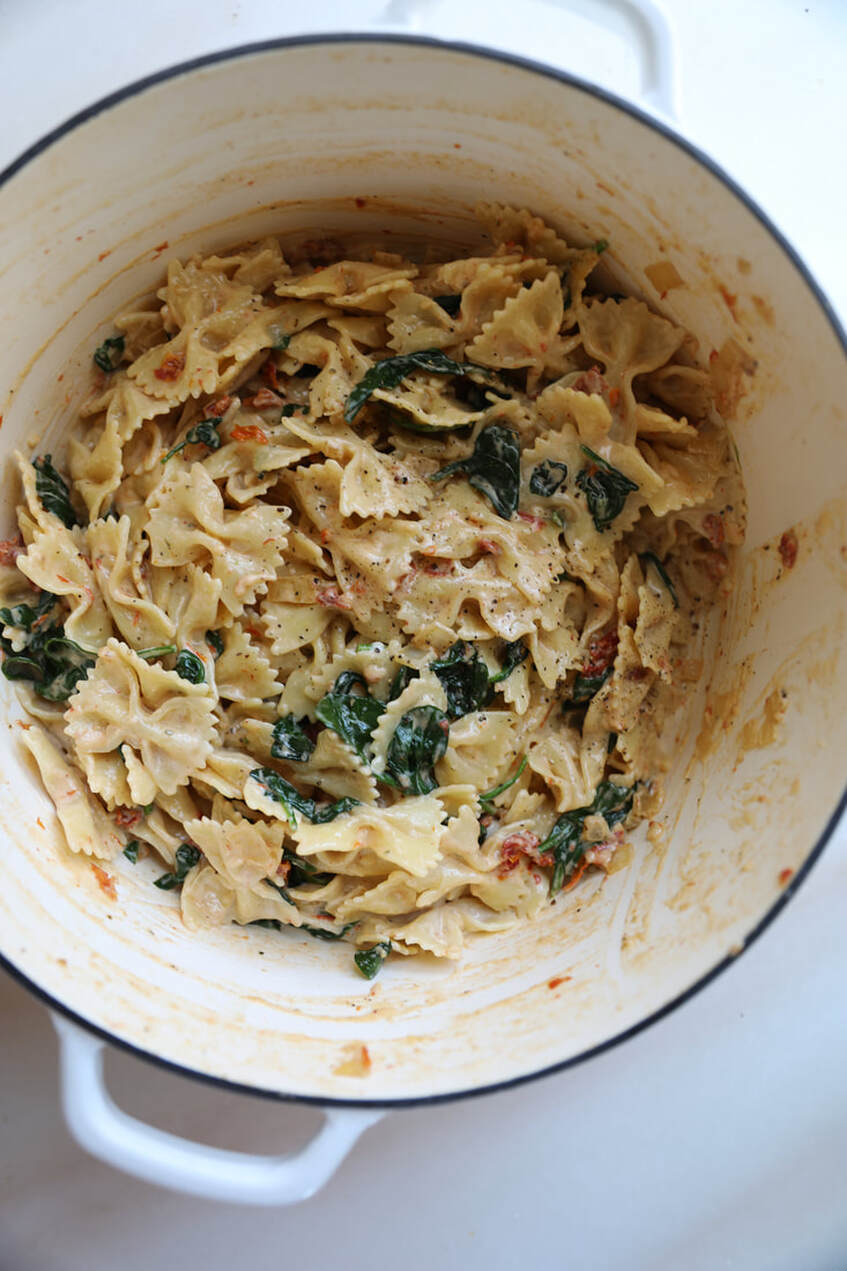 What you need:
For the sake of SEO, we're calling this one 'pesto chicken pasta' but it's more of a version, and definitely not classic Italian pesto (due to my pine nut allergy.) I also added in a ton of spinach to give it a little more of a higher nutritional value!! 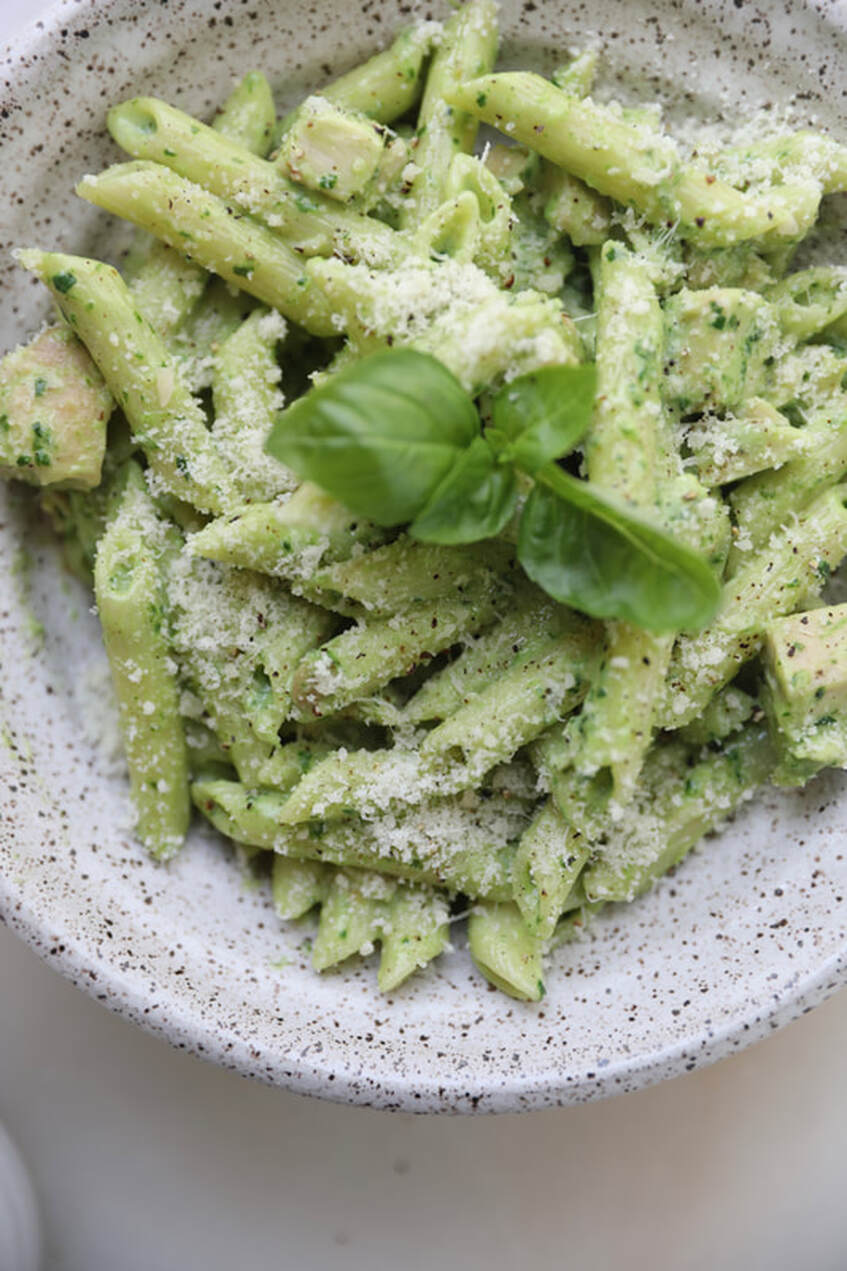 What you need: For the nut-free, spinach pesto
What to do:
Okay this is like the most comforting and delicious white sauces out there. Different than any other white sauce I've had because of the unique flavor profile from the combo of the taleggio cheese and the truffle oil. It's so damn good, perfect for any occasion but I could see this being a really great date night pasta dish too!! I know a lot of you will ask about a sub for the taleggio since it's not the most common cheese - but most grocery stories will have it near the specialty cheese sections. You'll want to find a brand that's imported from Italy, the good stuff. The texture reminds me a lot of brie! But the taste is definitely different, and the smell of the rind is more pungent.  What you need:
What to do:
This is my FAVORITE way to make french onion dip. I think the mayo is what takes the flavor to the next level!! I know there are a lot of people who don't like mayo - it can be left out but it's just nottttt as good without it! I have also made diff versions of this with half sour cream: half greek yogurt, and full on all greek yogurt in place of the sour cream, good that way too and a bit healthier!  What you need:
What to do:
I've been missing warmer weather and tomato season so much!! Decided to use up some leftover cherry tomatoes I had in the fridge to make this easyyyyy pasta sauce. I love the taste of anything tomato/basil - mashing the tomatoes into salty starchy pasta water and then adding some butter to it was suuuuch a good move!! It might be January, and currently snowing outside but this pasta dish feels like the hug I needed from warmer times!! As always, this recipe makes enough for 2 large entrees, or 3-4 smaller portions. 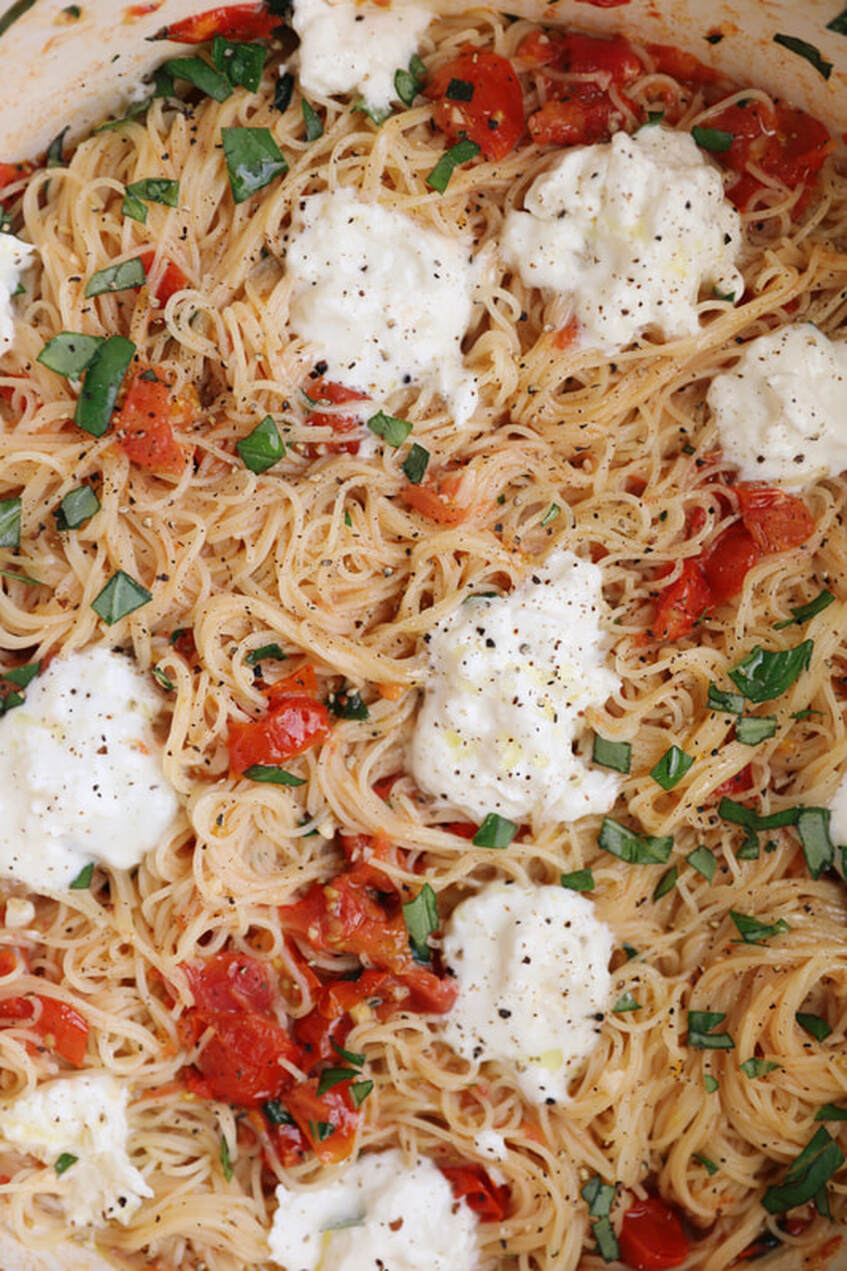 What you need:
What to do:
Inspired by shrimp and grits but we switched out the protein and the carbs!! I have a shrimp allergy so I cook with scallops in their place all the time! The creamy and subtle smoky flavor of the gouda mixed with cajun seasoning is a dream come true!! The perfect compliments to each other and so good with seafood!! This dish would also be really good with chicken or andouille sausage too. 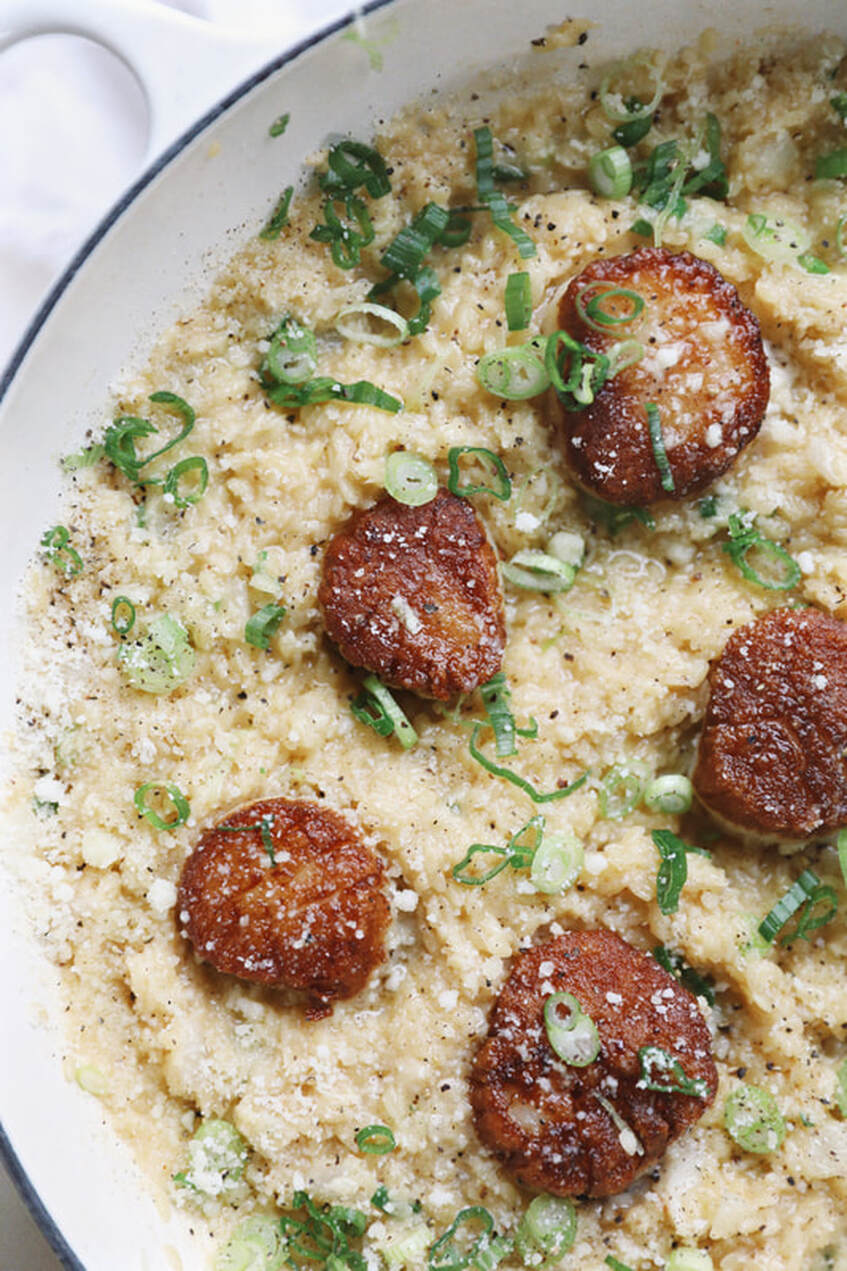 What you need:
What to do:
I used to eat pasta out of a little package (I think the brand was called Knorr?) when I was younger and I was innnn loooove. It's such a simple pasta dish! Good on it's own but also super easy to add in protein or veg of choice, or pair it as a side with whatever entree you're cooking up. The wine and the red pepper flakes are def optional depending on your alcohol and heat preferences. If you don't use wine you may need an extra splash of pasta water at the end to make up for the missing liquid - but it's not a ton so you'll have to play it by ear as you go! Sometimes when I make this, I add in lemon too - so good. 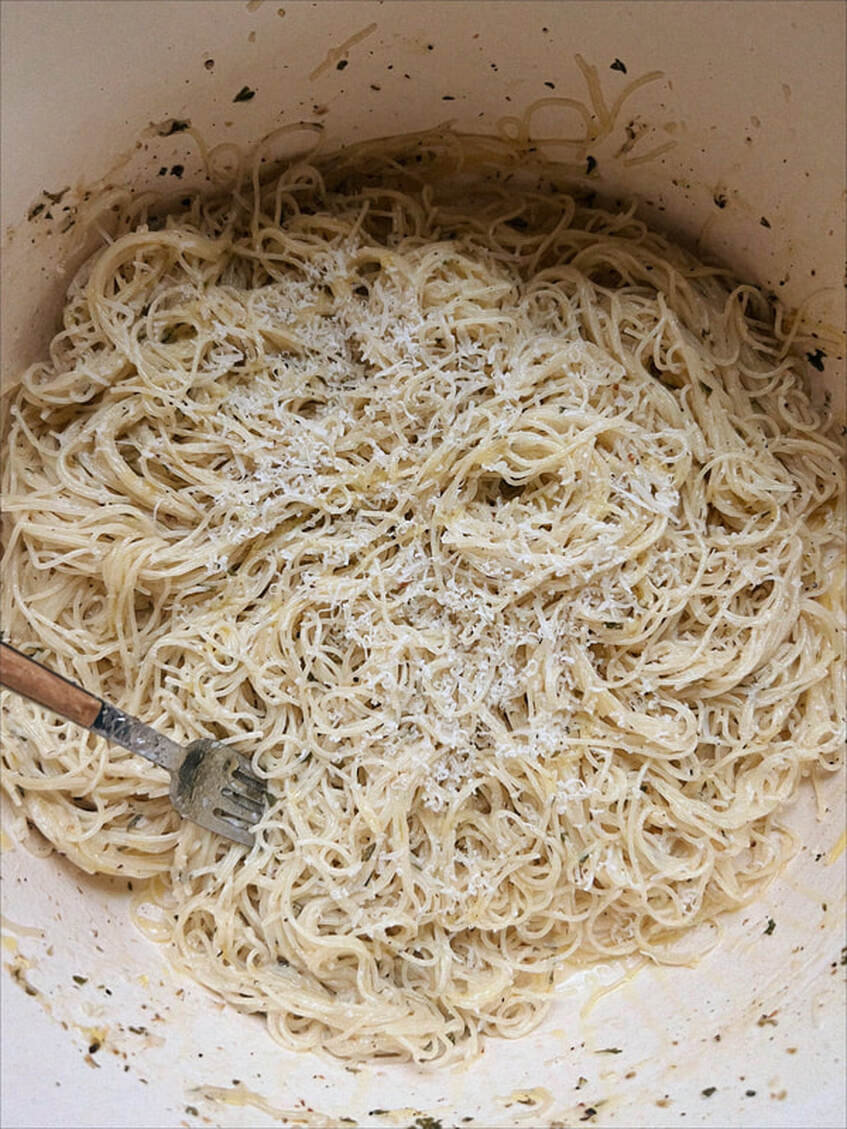 What you need:
What to do:
So I went to Chicago a few months ago in the fall and had some of the best dang short rib ragu EVER - Quartino's if you're wondering! ;) Whenever I travel I always like to come home and recreate dishes I loved while away - so the inspo for this one is coming from that! This recipe is quite literally the opposite of all my simple recipes - it's def easy but not as quick as finishing a sauce in the time that your pasta is done boiling! It's a labor of love for sure and worth every second. The recipe video that I posted to instagram is a doubled version. The finished sauce freezes really well and since it's so much work, I love to freeze half of it to have on demand for another time without having to simmer for 4 hours! Recipe as is (4 short ribs) makes enough for 6 servings. The recipe doubled (8 short ribs) makes enough for 12 servings. HERE ARE MY TIPS:
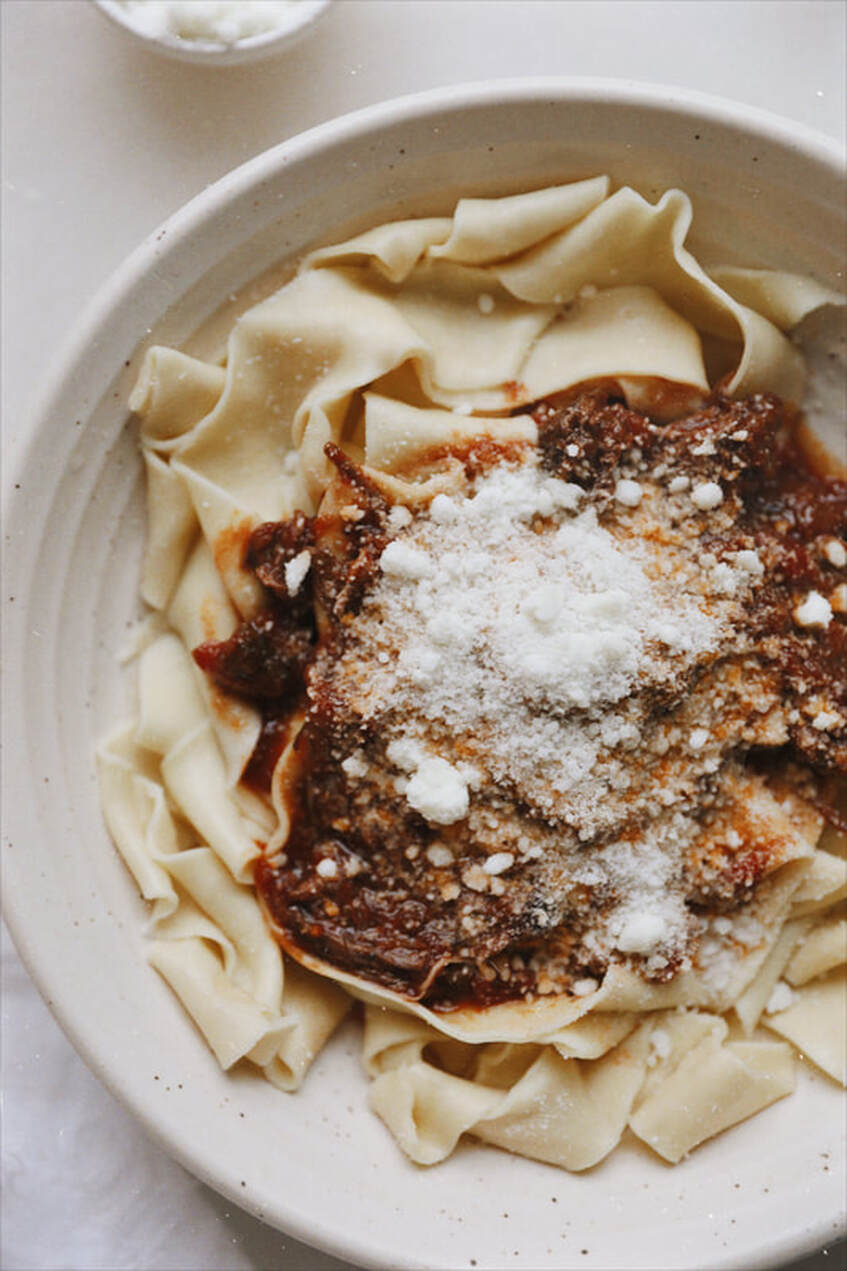 What you need:
What to do:
I first made this recipe in 2018 - butttttt it's only lived on my IG highlights until today!! So excited to type it all up and get the recipe into a more formal, shareable space for you guys! It's a fun one! I LOVE sausage gravy and I think it pairs so well with pasta and yolky egg. If you don't like spicy, you can obviously leave out the red pepper flakes. I don't want to hear any nonsense about how many calories must be in this dish - it's totally a cozy, treat yourself kind of meal!! 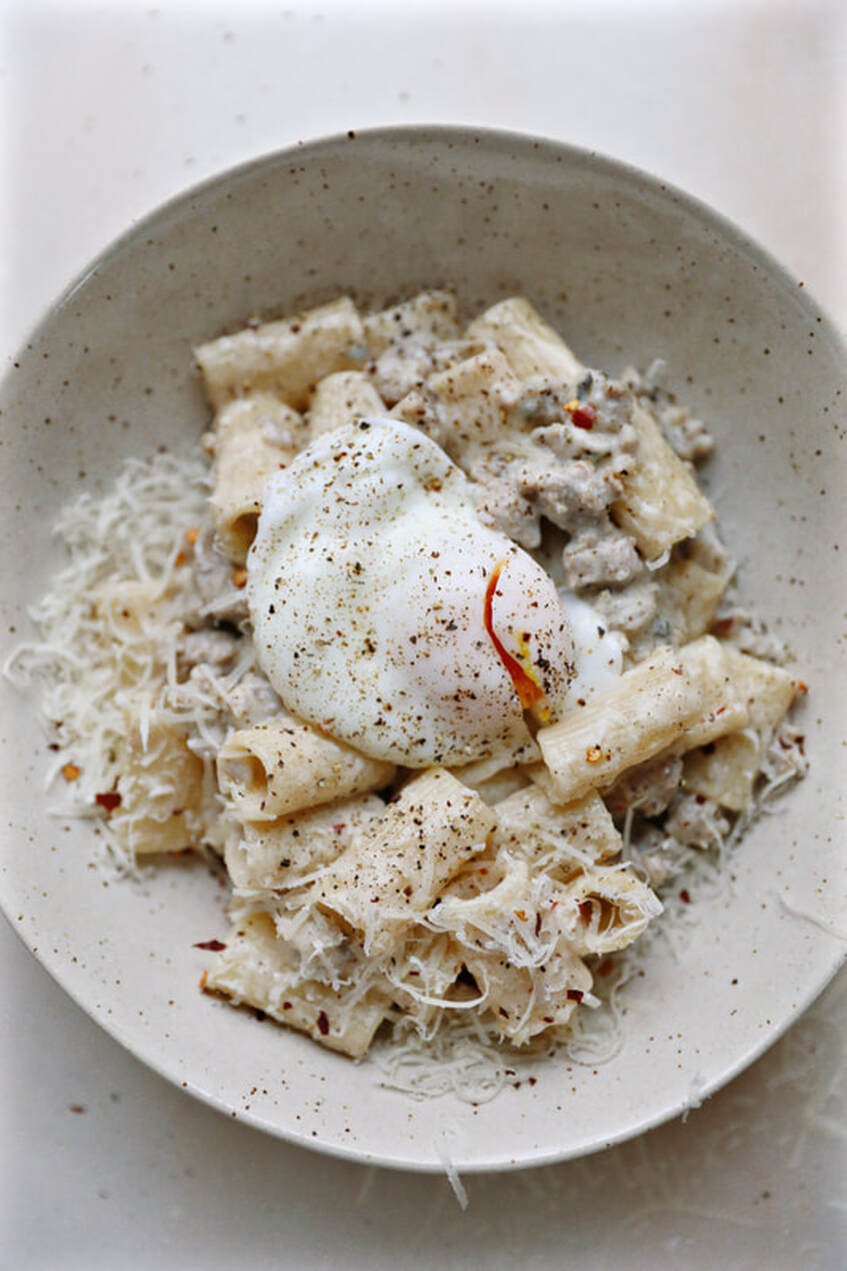 What you need:
What to do:
Okay so I buy these Kid Fresh frozen meatballs from the grocery store (they're pretty expensive but I love that they have hidden veggies in them!) and my whole family LOVES them. Win win. I thought about making meatballs with hidden veggies at home but wasn't motivated enough to try until I got the idea to try and use the veggies that are mixed with meat to make a classic bolognese sauce!! The meatballs actually cook in plain tomato sauce and the flavor comes out and seasons the whole dish. It tastes like bolognese but it's just fun to have meatballs instead of chunky ground meat!! 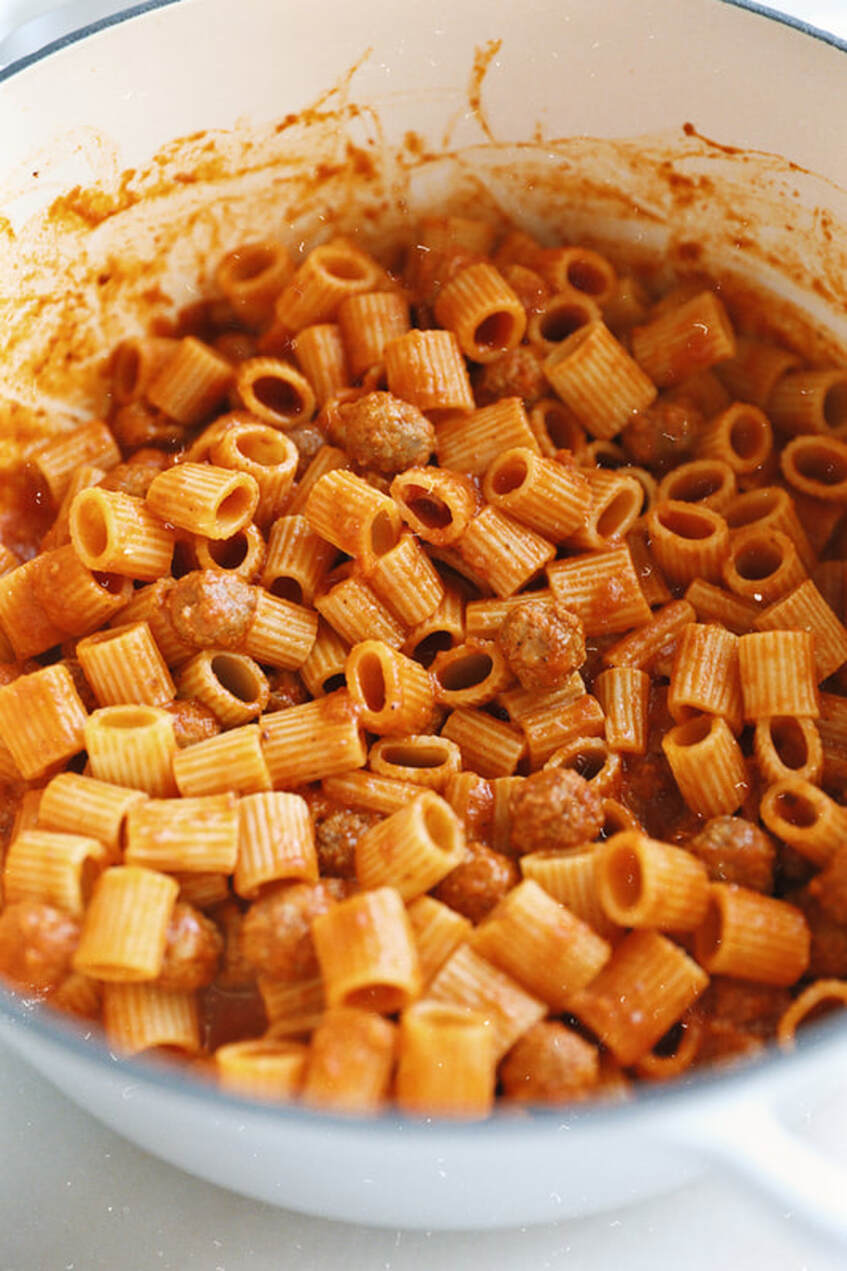 What you need: For the meatballs
What to do:
I loveeee when I have things in my fridge that end up being pieces to an amazing recipe puzzle. I was so hungry and had no idea what to make and kept finding myself staring at this rotisserie chicken that was about to expire + these leftover veggies from making bolognese. I was thinking soup but I also wanted something rich too and the way that I made the creamy base is ABSOLUTE FIRE. I was tempted to add in some sage to give it a little fall vibe, but I kept it simple. The lemon is def optional too, but I like the unique flavor it brings to the classic chicken noodle soup vibes. 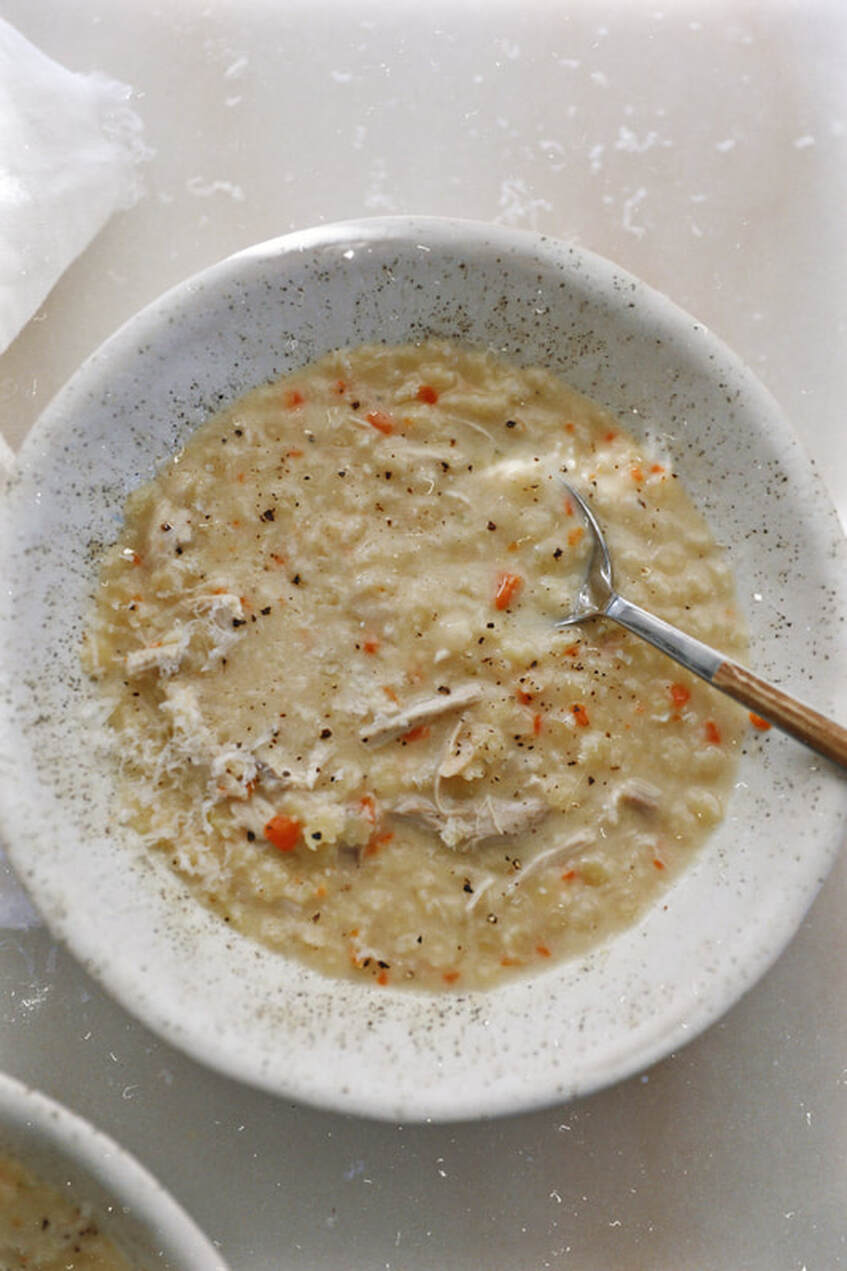 WHAT YOU NEED:
WHAT TO DO:
This recipe is such a good one!! Most creamy pasta recipes that I make source the cream factor from heavy whipping cream but this one swaps that out for baked feta cheese!! It's such a good sub. I love using Athenos brand for feta cheese, it gets super creamy when you bake it which is PERFECT for pasta dishes!! This recipe is totes inspired by my bestie @grilledcheesesocial, linking her original recipe here! We made a similar version together a couple years ago and she is the viral queen for all things baked feta pasta! Recipe makes enough for 3-4 serving sizes or 5-6 smaller side portions! (Most of my recipes call for 1/2 lb of pasta or 2 servings. If you want to make that amount, just use 1/2 lb of pasta and use a bit less of the pasta sauce. And actually, if you reserve some of it before you thin it out with pasta water, it makes a REALLY good dip!!) 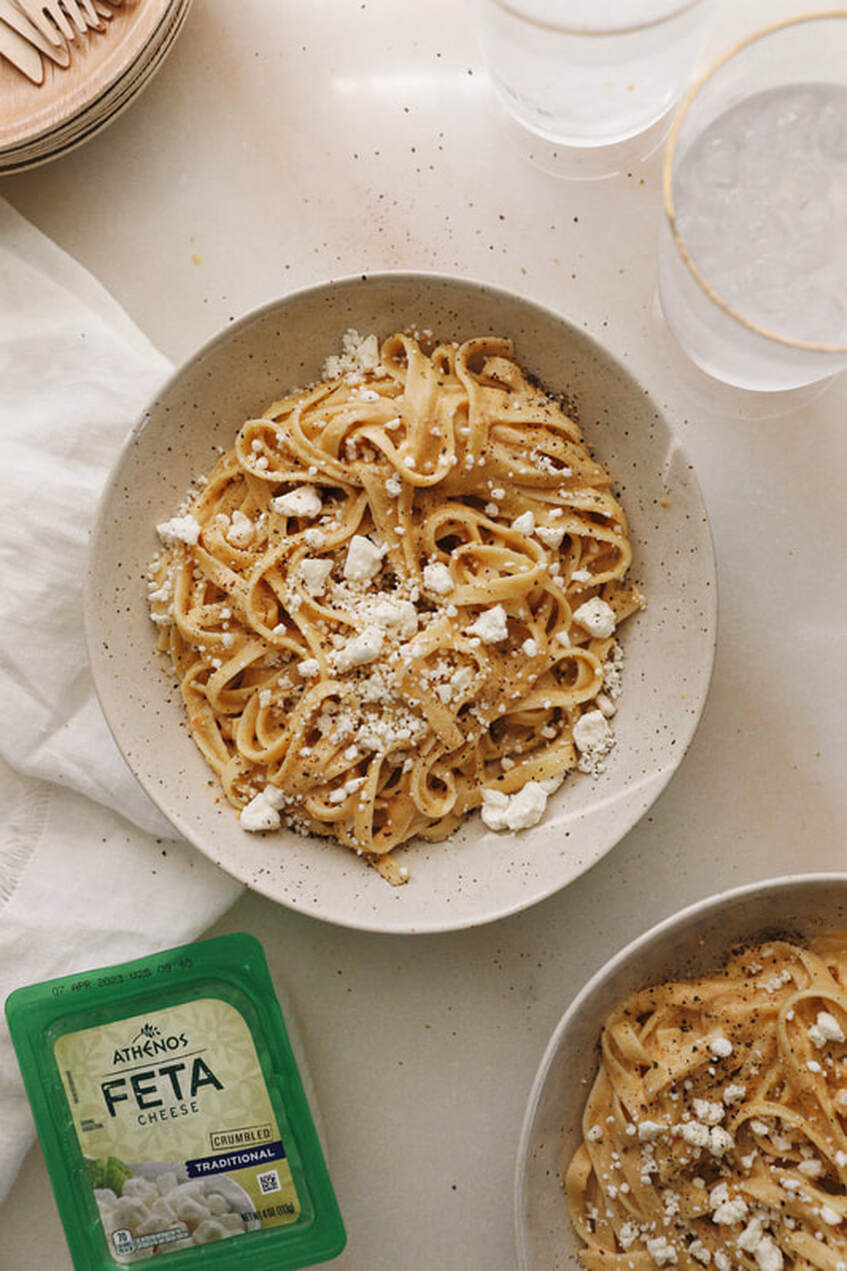 What you need:
What to do:
This is a BIG batch of soup - like double the amount of my standard recipes. I would say it serves 8-10 people. I made it for a lot of friends and wanted extra on hand for my family throughout the week! If you want to cut it in half, to make a smaller batch for like 3-4 people, feel free! I originally set out to create a butternut squash lasagna soup but I didn't really love it with lasagna noodles! That's why there's ricotta cheese involved here. I swapped out the lasagna noodles for tortellini and loved it way more!! I also added a ton of spinach leaves after I was done filming and that was a great addition too. ONE MORE THING. The texture of the soup is very customizable and will vary depending on the size of the squash. I ate it as is, which was more on the thick side as far as soups go. I ended up adding broth to the rest of it that I shared with family members, it was more soupy and less saucy that way, if that makes sense. Since I was storing it in the fridge, I didn't want the tortellini to soak up all of the soup and thought more broth was a good idea! So definitely pay attention to the thickness and texture as you're going and adjust it (with more or less broth) to whatever you prefer!! 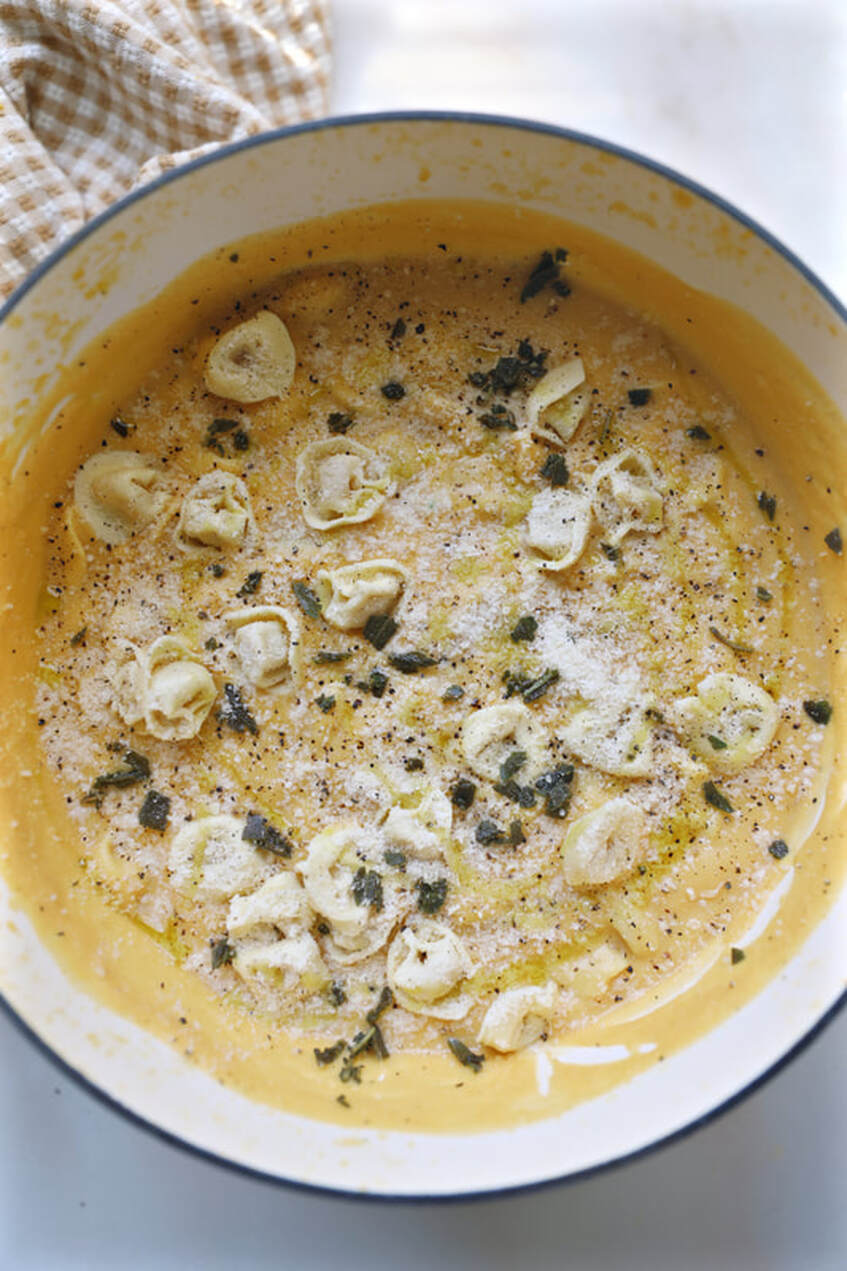 What you need:
What to do:
I was looking at photos of this recipe that I made and photographed back in our first house in 2017 and realized that the recipe has never actually lived online!! It's always been written out in the Instagram post's caption! Sharing here to give it a more permanent and sharable home. When I first made this recipe I was going for alfredo vibes. Since 2017 - I've learned that traditional alfredo components don't involve heavy cream lol, that's American alfredo! So call it what you want, but there are definitely alfredo vibes. The key to making the sauce super luscious is watering it down with pasta water and adding a pat of butter while mixing the pasta into it. IMPORTANT: Almost all of my recipes make enough for 2 large portions or 4 smaller side dishes of pasta, but since we're roasting an entire butternut squash here, this is a larger scale recipe. It makes enough sauce for 6-8 pasta dishes. (6 regular serving sizes and 8 on the smaller side.) So what I usually do, is I cut the squash/garlic/cream puree in half after it comes out of the blender. Before watering it down with salty pasta water and adding butter, it's essentially butternut squash soup, so I eat it that way as soup or save it to pour over another batch of pasta in a few days!  What you need:
What to do:
It's soup season!! I'm kicking off a recipe series where I turn my favorite pasta dishes into soups and this is the first one so there will be more where this came from!! This recipe makes enough for 4-5 people and is super good as leftovers for the next few days too! This recipe is inspired by my creamy tortellini recipe - very similar situation, but with more broth! You could definitely add in some greens like kale or spinach - or some protein like chickpeas or Italian ground sausage or beef!! 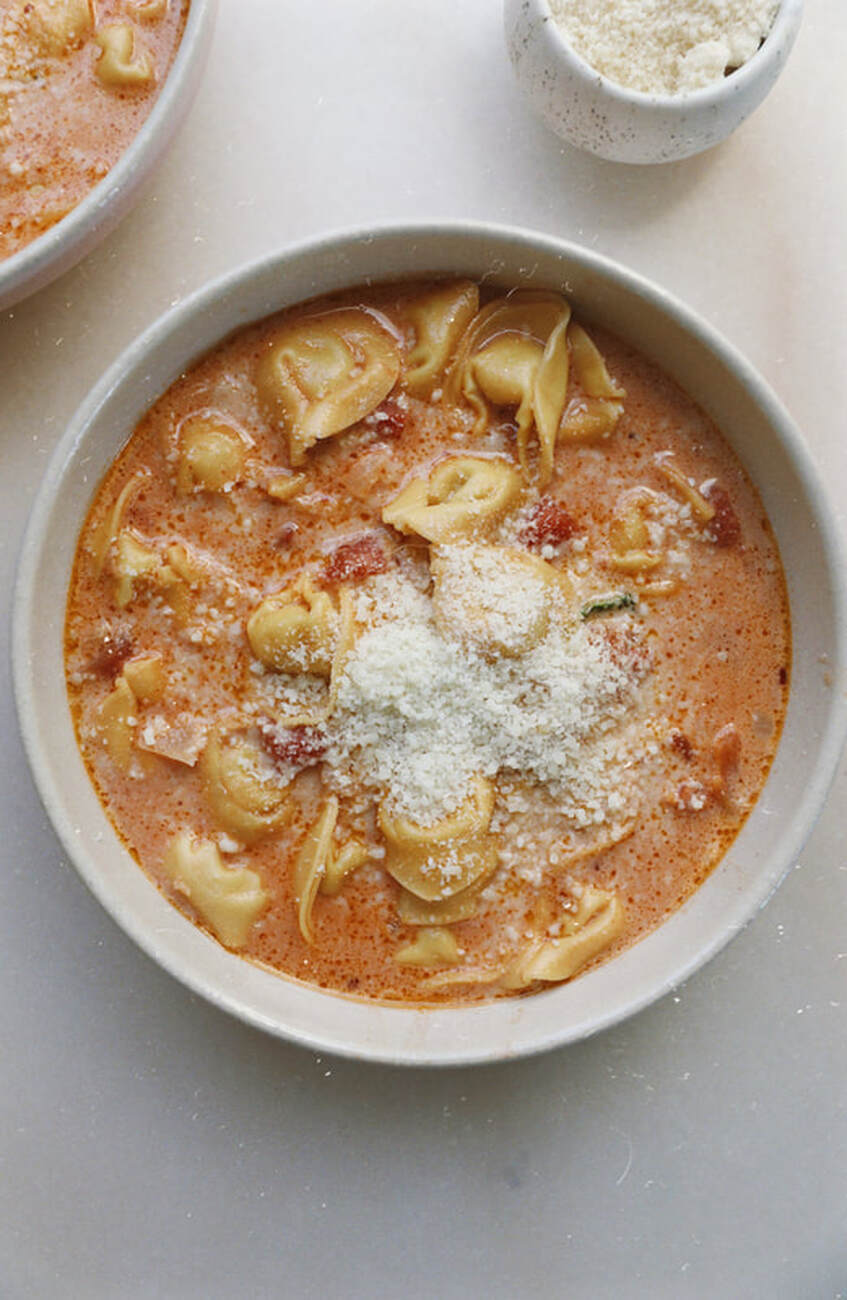 What you need:
What to do:
I'm freaking out. This one is a fall twist on my viral 'French Onion Soup' rigatoni recipe from a few years back. I started the pasta dish off by caramelizing two onions in my FAVORITE butter, Truly Grass Fed and then I went on to add pumpkin, cream, gruyere, and nutmeg before topping the whole thing off with crispy prosciutto and burrata! The caramelized onions compliment the pumpkin and gruyere flavors soooo well, I can't even. You have to try it!! The recipe makes enough for 2 large entrees, 3 medium entrees, or 4-5 smaller side dishes. 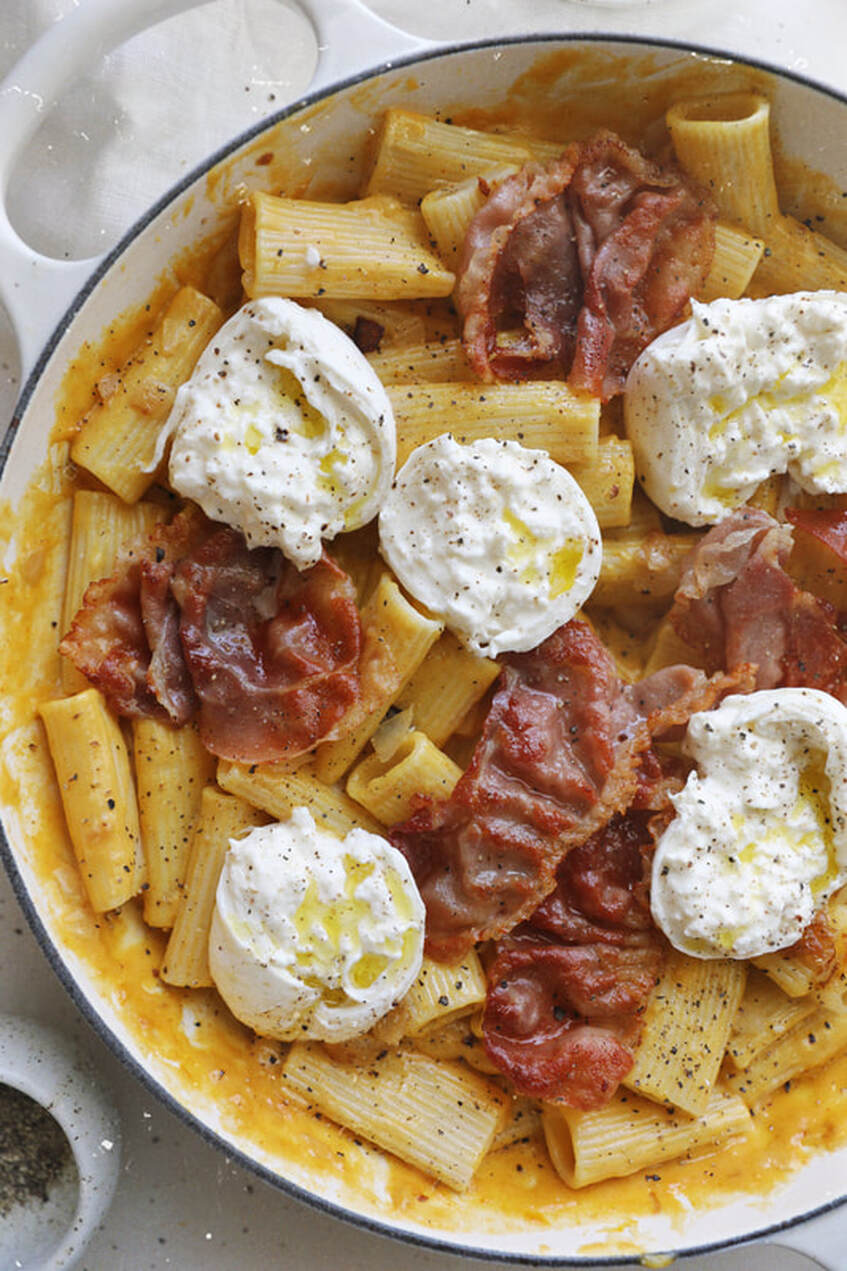 What you need:
What to do:
I love making salads with pasta in them!! Especially tortellini since it's filled with cheese, lol. The best part is that you can either go pasta heavy or salad heavy depending on your mood and the occasion!! 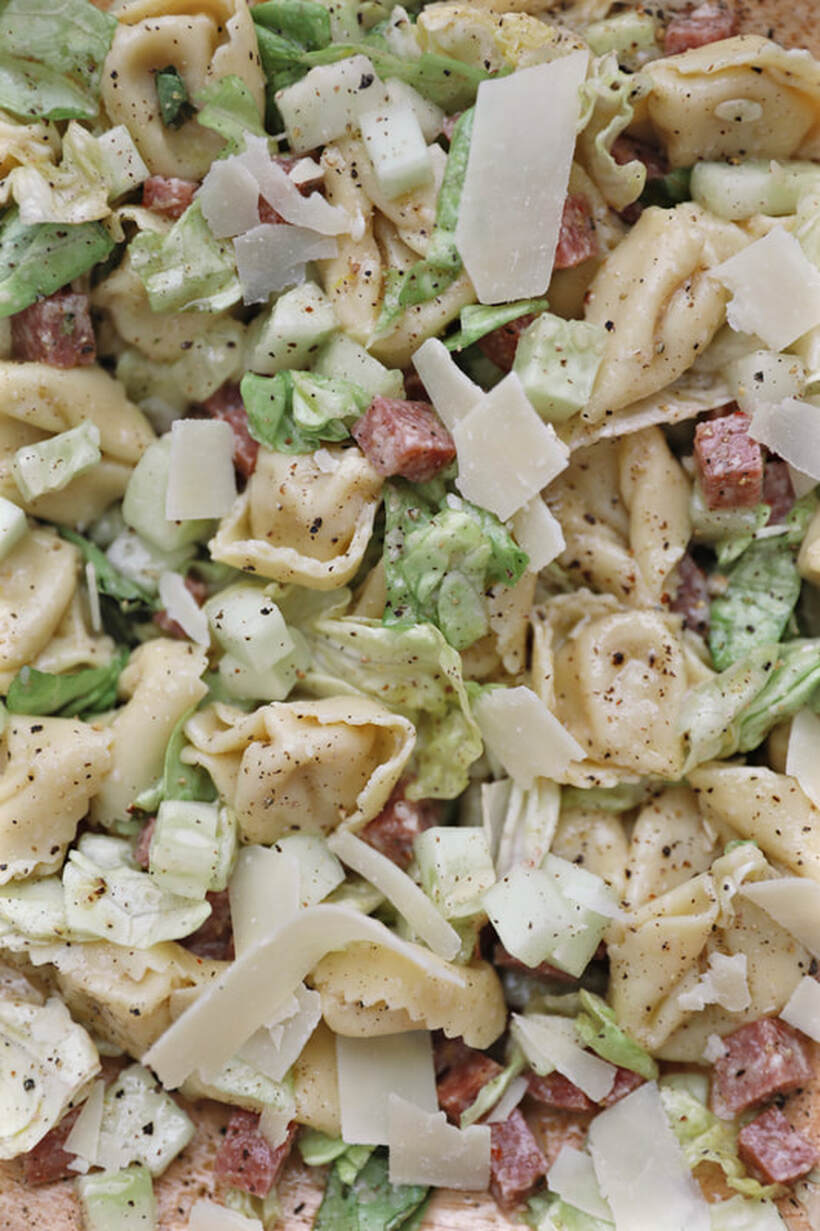 What you need:
What to do:
This is one of my all time favorite pasta dishes. I was NEVER impressed with it when I ordered it from restaurants and then at some point I read about it online and decided to try and make it at home - so much better that way because I put all of the love and effort into all of my pasta dishes that I make in my kitchen!! Aglio e olio is a simple and classic Italian dish. There are a ton of spin off versions of it but the essentials will always be the garlic (aglio) and the oil (olio.) This is a recipe that's super dependent on the technique since the ingredients are so simple, so pay attention to these two notes lol: You have to gently cook the garlic (and optional red pepper flakes) in good quality EVOO, that way the oil is infused with a deeeep garlic flavor. You have to salt your pasta water. Adding starchy salty pasta water to the skillet with the garlic and oil is CRUCIAL because it helps emulsify the sauce to create a silky, less oily texture. 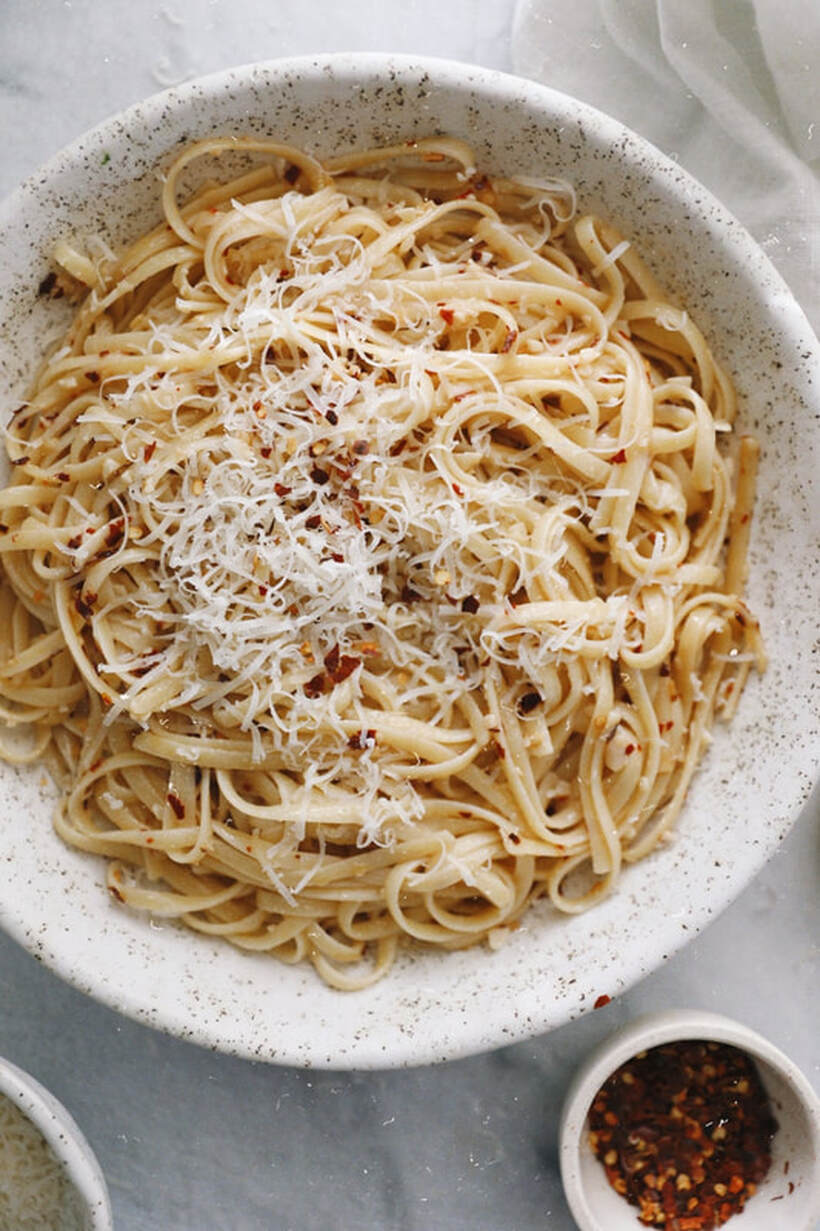 What you need:
What to do:
|
ConnectIf you’d like to use my photos & recipes, please ask or link back to this site. Thank You.
Calendar
November 2023
|
 RSS Feed